3. Contributing to Rasdaman
We’d like to encourage everyone to contribute to the project in whatever ways they can. This is a volunteer project; all help is greatly appreciated.
We don’t have a rigid styleguide or set of rules for contributing to rasdaman; however, with the goal of making things easier for all developers, here are a few suggestions:
Get feedback from other people
This is what the Mailing Lists and this Trac project management system are for. It is always a good idea to talk to other devs on the mailing lists before submitting changes.
Use Trac tickets
This is important to track progress and activity. If you start working on an issue, accept the ticket. After you have finished, close the ticket, and add information about the changeset in the comment field. Provide also progress information when you make relevant changes as described in the UseOfTickets page
Write tests
Please write tests for any new functionality. See Adding Tests for instructions. We ask you for your understanding that patches are likely to get rejected if they do not contain adequate additions to the systemtest.
Stick to the Coding Standards
The rasdaman code guide is mandatory for all code. We ask you for your understanding that patches are likely to get rejected if they do not adhere to this guide.
Use meaningful commit messages and reference tickets
such messages help developers to understand what your goal and intent is. Further, it eases writing of release notes for new versions. Note that patches not starting with “ticket:nnn” will be automatically rejected.
3.1. Development Contributions
You developed a fix or some new functionality? We are grateful for your contribution. Of course we like any useful information, but best (and fastest) for inclusion is to be in sync with our development tools and processes. The following details are provided to help in this respect.
All our development is in Linux. Please consider this for your code.
We use git as a version management tool, so you may want do do that too. Check out from the repository using:
$ git clone git://rasdaman.org/rasdaman.git
$ git config --global user.name "Name Surname"
$ git config --global user.email my_email@address.xyz
After ensuring the tests are successful (see Adding Tests), stage and commit your changes:
$ git add <file1> <file2> <dir1/> <dir2>/*.java ...
$ git commit -m "ticket:NNNN - [FIX|NEW] My brief explanation of the patch"
NNNN indicates the number of the ticket that is addressed with this patch, [FIX] should be set when the patch contributes a bug fix, or alternatively [NEW] should be used when the patch introduces a new feature.
Prepare your patch package through:
$ git format-patch -n
where
nis the number of last commits that you want to create patch files for.Upload your patch file (or a
.tar.gzarchive in case of several files) using Patch Manager to the defaultmasterbranch. You will have to accept the Contributor Agreement. Without your stated consent we unfortunately cannot accept it, due to legal reasons.If your patch is a [FIX], reupload it again by selecting the
release_X.Ybranch for the latest X.Y rasdaman version, e.g.release_10.0. It may be necessary to first rebase the commit to this branch in your local repository clone.
3.2. Documentation
Any changes to public interfaces likely require updating the rasdaman documentation. This is a short guide on how to do this.
3.2.1. Getting started
Install dependencies
On Ubuntu 22.04 and later:
$ sudo apt install python3-sphinx python3-sphinx-rtd-theme
On Ubuntu 20.04 or earlier:
$ sudo pip install -U sphinx sphinx_rtd_theme
Main documentation can be found in
doc/main(*.rstfiles).There are two ways to rebuild the docs when you have made changes to them.
In the build directory of rasdaman (see relevant documentation), the documentation can be built if you have configured rasdaman with
-DGENERATE_DOCS=ONargument for cmake:$ make doc # generate all documentation $ make doc-html # generate HTML documentation (requires sphinx) $ make doc-pdf # generate PDF documentation (requires sphinx, latexmk, texlive)
The generated documentation can be found in
HTML -
<build_dir>/doc/main/html/index.htmlPDF -
<build_dir>/doc/main/latex/rasdaman.pdf
Alternatively, in the rasdaman source tree:
$  cd doc/main/
$ ./build.sh      # generate all documentation
$ ./build.sh html # generate HTML documentation (requires sphinx)
$ ./build.sh pdf  # generate PDF documentation (requires sphinx, latexmk, texlive)
Note that in this case you should have executed cmake in the build directory with
-DGENERATE_DOCS=ONat least once (see relevant documentation); this will generatedoc/main/conf.pywhich is required to run./build.shabove.The generated documentation can be found in
HTML -
<source_dir>/doc/main/_build/html/index.htmlPDF -
<source_dir>/doc/main/_build/latex/rasdaman.pdf
3.2.1.1. Make changes
Check the short intro below for the reST syntax
… but it should be fairly clear from looking at the docs sources
Make sure text lines are at most around 80 columns wide (exceptions are links and tables); try to reformat code sections as well to fit within this width.
Create a review request with arc diff before pushing changes.
3.2.2. Quick intro to reStructuredText
3.2.2.1. Section headers
In each case the underline or overline marker should be as long as the section header (use monospace font to do this correctly). From highest level to most granular section level:
#- Parts (overline and underline)*- Chapters (overline and underline)=- Sections (underline)-- Subsections (underline)^- Subsubsections (underline)
Example from the QL guide:
3.2.2.2. Text formatting
*Italics*
**Bold**
``Code``
Cannot be nested, may not start/end with whitespace, and has to be separated from surrounding text with some non-word characters.
3.2.2.3. Lists
Bullet and number lists are supported:
Option lists
(e.g. the output of rasql -h) can be simply copy pasted, you just need to
make sure the options and their descriptions form two columns.
3.2.2.4. Source code
Any source code can go as an indented text after :: (plus blank line).
In the QL guide :: automatically does rasql highlighting. For example:
::

    -- example query
    select avg_cells(c) from mr2 as c
renders as
-- example query
select avg_cells(c) from mr2 as c
For different highlighting you have to use the code-block directive indicating the language, e.g. java, cpp, xml, javascript, text, ini, etc. Example for java:
.. code-block:: java

    public static void main(...) {
        ...
    }
Furthermore, you can specify code blocks that are foldable, and hidden or shown by default (see extension documentation; starthidden is True by default and can be omitted):
.. hidden-code-block:: java
   :starthidden: False

    public static void main(...) {
        ...
    }
shows as
 public static void main(...) {
     ...
 }
You can see all lexers with pygmentize -L lexers; see also
http://pygments.org/languages/
3.2.2.5. Images
If an image has no caption then use the image directive, e.g:
.. image:: media/logo_full.png
    :align: center
    :scale: 50%
If it has a caption then use the figure directive; the caption is added as an indented paragraph after a blank line:
3.2.2.6. Hyperlinks
To just have a URL as is nothing special needs to be done, just put as is:
http://rasdaman.org
To render the URL with alternative text, then the following form should be used:
`Link text <http://rasdaman.org>`_
Internal cross-referencing can be done by first setting up a label before a section header or a figure (see above this section Hyperlinks) and then using it to generate a link anywhere with
:ref:`my-label`
Instead of :ref: you can use :numref: to get automatic Figure number added to the link, e.g.
:numref:`my-label` -> Sec. 2
You can change the default text that :ref: generates like this:
:ref:`Custom text <my-label>`
3.2.2.7. Further information
3.3. Git resources
For extensive help on git see the online Git book.
For info on git conflicts see Handling and Avoiding Conflicts in Git or, for a quick resolve conflict by discarding any local changes, this StackOverflow answer.
Further tips:
3.3.1. Basic git for working on tickets
It is suggested to create a branch in your local working copy of the rasdaman git repo for each ticket/fix, so you will not mix up patches. (e.g: ticket:1450 -> branch ticket_1450, ticket:1451 -> branch ticket_1451, …)
Prerequisites
Checkout the newest source code from repository; suppose you did this in
/home/rasdaman/rasdamanand you are in this directory in the terminal:$ pwd /home/rasdaman/rasdamanList the branches in your local repository
$ git branch
3. Switch to branch master - as this branch is the canonical branch for the rasdaman remote repository
$ git checkout master
Pull the newest patches if possible from remote repository (rasdaman.org) to your local repository
$ git pull
Create a new branch from master branch for a particular fix or feature work:
$ git checkout -b "branch_name" # e.g: git checkout -b "ticket_1451"

# check current branch, it should be ticket_1451
$ git branch
Work and commit changes
1. You changed some files in the source code directory (e.g: file1.java, file2.cc,…) and you want to create a commit; first stage the changed files:
$ git add file1.java file2.cc ..
Warning
Avoid doing git add ., i.e. adding all changed files automatically.
Now you are ready to commit the staged files:
$ git commit -m "ticket:1451 - fix some stuff"

# see details of your commit on top
$ git log
And create a patch from the commit, i.e. a file with extension
.patchcreated from the last commit =-1, which contains all the changes you made:$ git format-patch -1 # or for code review $ arc diff
3. After your diff is reviewed and accepted, finish with this branch by uploading the patch to the patchmanager and switching to another ticket in a new branch, starting from master again.
Switch between pending patches
E.g you finished one ticket on ticket_1450 and uploaded to the patchmanager but the patch is rejected and needs to be updated, while you moved on to working on ticket_1460.
First, stage everything you are doing on ticket_1460; if you don’t want to create a temporary commit, you can just stash everything in current branch.
$ git add <file1> <file2> ... # or stash $ git stash # later can be retrieved with $ git stash pop
Then commit it as your pending patch on this branch
$ git commit -m "ticket:1460 - fixed stuff"Make sure your current branch is clear
# should report: "nothing to commit, working directory clean" $ git statusNow switch to your failure patch (e.g: ticket_1450):
$ git checkout ticket_1450
Fix the issues here and stage the newly changed files:
$ git add <file 1> <file 2> ...
Commit it without changing the ticket’s subject:
$ git commit --amend --no-edit
Create a patch from the updated commit:
$ git format-patch -1 # or for code review $ arc diffAnd upload it again to the patchmanager
Finally, you can switch back to the previous branch:
$ git checkout ticket_1460
Apply patches between branches
E.g you have 1 commit in ticket_1450 and 1 commit in ticket_1460) then you want to add this patch to ticket_1460)
Check current branch (should be ticket_1450)
$ git branch
Create a patch file (like “0001-ticket-1450-fix-some-issues.patch”) from the last commit
$ git format-patch -1
Switch to other branch
$ git checkout ticket_1460
Apply your patch from ticket_1450
$ git am -3 0001-ticket-1451-fix-some-issues.patchCheck the newest commit (if the patch is applied successfully)
$ git log
If a patch cannot be applied
You made changes on files which the patch also changes, so you have to merge it manually:
$ git am -3 0001-ticket-1450-fix-some-issues.patch
# The patch is not applied, some conflict shows here
Please follow our git conflict resolution guide, or Steps 3 to 7 of this resolving merge conflicts guide.
Once resolved, mark as such:
$ git am --resolved
Check that your patch from ticket_1450 is now the last patch in ticket_1460 branch:
$ git log
3.4. C++ Guidelines
The rasdaman system is implemented in C++ 11; below are some guidelines.
3.4.1. IDE
Developing C++ code is no doubt a much better experience with good IDE support. Below we give some guidelines.
3.4.1.1. Qt Creator
Qt Creator is very well suited for hacking on rasdaman: it’s free and open-source, very fast and low on resource usage compared to alternatives, has built-in debugging support, code formatter, and other useful features.
Below you see a video that walks through setting up Qt Creator on Ubuntu 18.04. A short transcript:
install Qt Creator with
sudo apt install qtcreatorstart Qt Creator
we assume rasdaman was cloned into
~/rasdaman, and create a build dir at~/rasdaman-buildrun CMake to configure the build, see ref:sec-system-install for more info
note: it is recommended to create the build directory outside the source tree, to avoid confusing the IDE with build artefacts
go to
File -> Open File or Projectin Qt Creator, navigate to the rasdaman source tree and selectCMakeLists.txtthis will lead to importing the
~/rasdaman-builddirectory from which Qt Creator will figure out the build configuration; for development we normally want a Debug configwith that the rasdaman project is now ready for development in Qt Creator
some of the features are then shown in the video:
start building rasdaman (same as
make) from within Qt Creator withCtrl+Bnavigate to a file with
Ctrl+k(there are a lot more options for quick navigation)Ctrl+left mouse clickleads to the declaration of a symbolF4will switch between header and source filesin
Projects (left sidebar) -> Runyou can configure the executable to be executed when running the project; normally we want this to be rasserver, and we specify the arguments like the query to be executed by rasserverF5will then start the debugger on the configured executable; you can set up breakpoints as usual to stop the debugger at certain locations or conditions
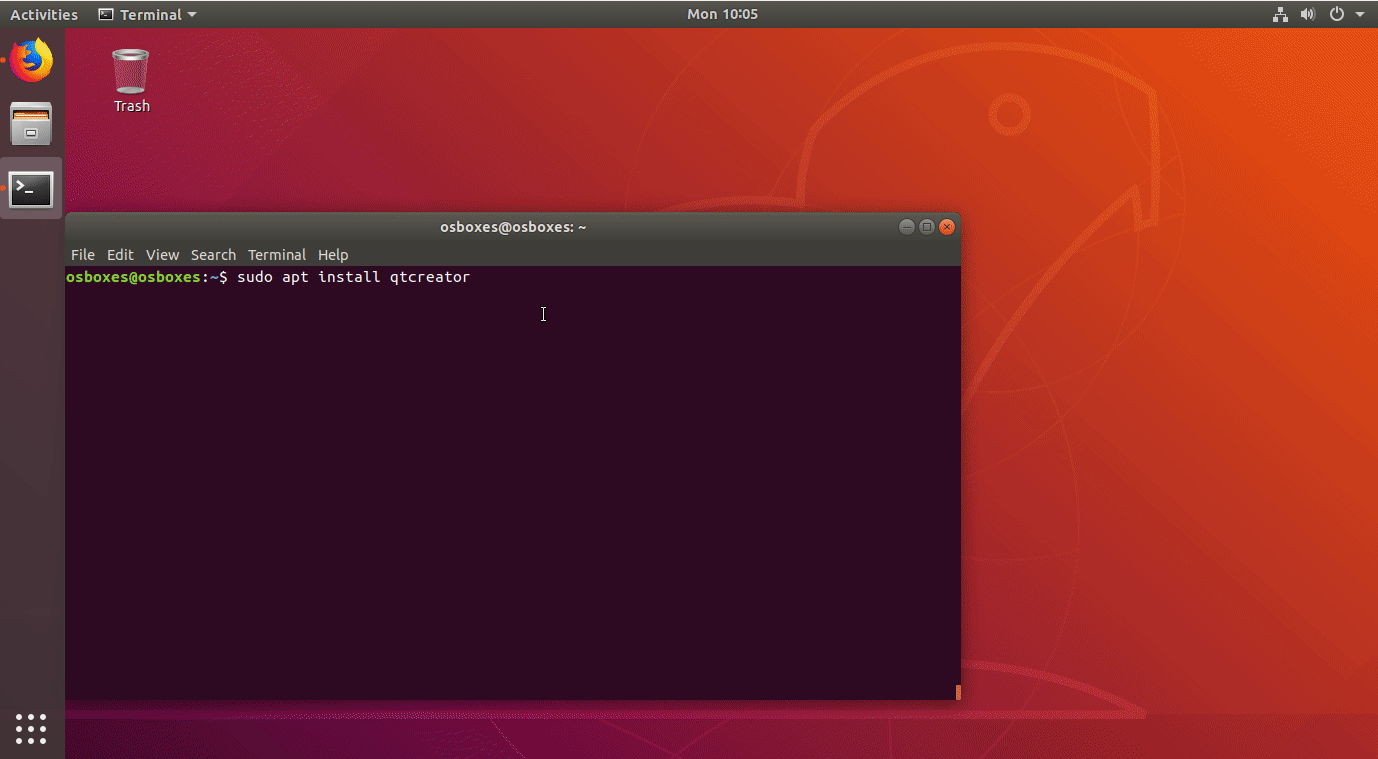
Figure 3.1 Setup Qt Creator for rasdaman development. Right click -> View Image to see the video in full resolution in your browser.
3.4.2. Debugging
The rasdaman code has facilities built in which aid debugging and benchmarking. On this page information is collected on how to use it. Target audience are experienced C++ programmers.
Important
It is best to configure rasdaman with -DCMAKE_BUILD_TYPE=Debug for
debugging, and -DCMAKE_BUILD_TYPE=Release for benchmarking (and
production deployment).
3.4.2.1. Debuging a running server
In rasnet (the default network protocol), in order to attach to the rasserver
process (with e.g. gdb -p <pid>) it is necessary to increase the values of
SERVER_MANAGER_CLEANUP_INTERVAL and CLIENT_MANAGER_CLEANUP_INTERVAL in
rasmgr/src/constants.hh to some large values; needless to say this requires
recompiling and restarting rasdaman.
Once that is done, you can attach to a running rasserver process. First find the process id, second column in the output of
$ ps aux | grep rasserver
It’s best to enable only one rasserver in rasmgr.conf or with rascontrol for this purpose. Then, attach to the pid:
$ gdb -p <pid>
3.4.2.2. Debugging a query directly
When not debugging the network protocol, it’s recommended to invoke
rasserver itself directly, instead of via the network protocol with
rasql. rasserver has a similar interface as rasql, and it is ideal
for easily running tools like gdb, valgrind, etc.
In this case use the same parameters as for rasql, but add
-d /opt/rasdaman/data/RASBASE (or substitute that to whatever is the
-connect value in rasmgr.conf).
Example with gdb:
$ gdb --args rasserver -q 'query that causes a segfault' \
                       --out file -d /opt/rasdaman/data/RASBASE
...
> run
...
# show a backtrace once the segfault has happened
> bt
3.4.2.3. Memory debugging with valgrind
Valgrind can be used to detect uninitialized values, memory errors, and memory leaks, e.g.
$ valgrind --leak-check=full --track-origins=yes \
           rasserver -q 'query that causes memory problems' \
                     --out file -d /opt/rasdaman/data/RASBASE
3.4.2.4. Memory debugging with AddressSanitizer
AddressSanitizer
can be enabled during compilation with -DENABLE_ASAN=ON. This adds
-fsanitize=address to the compiler flags. Please visit the ASAN page for
more details.
3.4.2.5. Enabling extra output at compile time
In order to effect any extra output (besides standard logging) at all, the code must be compiled with the resp. option enabled. This is not default in production operation for at least two reasons: writing an abundance of lines into log files slows down performance somewhat, and, additionally, logging has a tendency to flood file systems; however, the option is available when needed.
If you are compiling with cmake, simply use -DENABLE_DEBUG=ON
before doing make. Doing this includes the above cmake
flags for debugging, and it also sets two other variables to enable
more-verbose logging. E.g. in your build directory
$ cmake .. -DCMAKE_INSTALL_PREFIX=$RMANHOME -DCMAKE_BUILD_TYPE=Debug -DENABLE_DEBUG=ON ...
$ make
$ make install
You may, optionally, alter settings in $RMANHOME/etc/log-client.conf and
$RMANHOME/etc/log-server.conf to enable various other logging
parameters, e.g. DEBUG and TRACE for extra verbose output in the logs.
3.4.3. Internal array representation
Internally in rasdaman, multidimensional arrays are handled as a 1-D array, linearized in column-major format. Column-major refers to matrices with rows and columns, indicating that first all cells of the first column are listed in order, then all cells of the second row, etc. Given that we are working with multidimensional arrays here, this notion needs to be generalized: the inner-most (last) axis is contiguous, and varies fastest, followed by the second last axis and so on.
For example, let’s say we have an array with sdom [5:10, -2:2, 0:5].
The 1-D internal_array (in code) corresponds to external_array (in rasql):
3.5. Adding Tests
The rasdaman source tree comes with integration tests (“systemtest” for
historical reasons) and unit tests (in each component directory X there is a
subdirectory X/test/). To run the integration test:
$ cd rasdaman-build-dir
$ make check
After your patch submission, the patchmanager will automatically run the systemtest in a sandbox; the result will be flagged in the patchmanager table for each patch submitted. Allow some time (usually one hour) until the result gets visible. Patches which do not pass systemtest will be rejected without further inspection.
make check will automatically execute all test.sh / test.py scripts it finds
in the systemtest/ directory. These tests are distributes across multiple
directory named NN-<name>, where NN is some number.
Each test should have a folder which is inside one of the above mentioned
directories,. The test should be executed by a shell script inside the folder;
its exit code indicates whether the test passed (0) or failed (non-0). Details
of the test execution should be logged in the same folder. In
systemtest/util there are various bash utility functions that can be used
in the test scripts, e.g. for logging, checking result, etc.
3.5.1. Add a rasql test query
save the test query as
systemtest/00-select/queries/<queryName>.rasqlsave the expected query result file in
systemtest/00-select/oracle/<queryName>.oracle
To generate a test oracle you can just run the test, which produces results in
the output directory, and then copy the corresponding result to the oracle
directory with a .oracle extension. Make sure to validate the correctness
of the oracle before adding to the systemtest.
A single test query can usually be executed with ./test.sh <queryName>.rasql
To avoid reimporting the testdata every time, you can execute the test with
a --no-ingest option.
If a query is known to fail and documented by a ticket, it can be marked
in the systemtest, so that the result of that query is SKIPPED, rather
than FAILED. To do this create a file known_fails (if not yet
existing) in the corresponding test dir (next to the test.sh) and
put each query file name in a single line in this file.
3.5.2. Add a petascope test
3.5.2.1. Testdata
Various coverages are inserted when running make check with the
wcst_import test suite in 30-wcstimport/test.sh. These are subsequently
available in the WCPS, WCS, and WMS tests. At the testing end, they are removed
by running 40-dropcovs/test.sh.
3.5.2.2. Adding tests
To add new tests to the test suite, simply add new WCS or WCPS queries
to the queries directory. Please adhere to the naming convention,
continuing from the last number:
Type |
File name format |
WCS KVP |
|
WCS XML |
|
WCS SOAP |
|
WCS REST |
|
WCPS |
|
WCPS XML |
|
rasql |
|
Note
If the test is meant to raise an exception, add a further .error suffix to
the file name before its extension, for both query and oracle.
The associated oracle (.oracle) files must also be added to the oracle/
directory. The oracle can be automatically added by running the tests. In this
case it can be more convenient to run the tests on the single new query by
specifying the query file name as an argument of test.sh (e.g.
./test.sh 001-query.test).
3.5.3. Templated System Test
The rasdaman query templating engine rasqte (currently found in
systemtest/testcases_manual/test_rasql) allows to write template queries (in
Jinja2 format) that focus on the operation that
should be tested; a preprocessing step expands these templates into concrete
valid queries targeting various data configurations that can be evaluated in
rasdaman.
In Jinja2 templates we have:
Output markup (surrounded in
{{and}}which resolves to text; this supports some basic arithmetic, string functions, etc.Tag markup (surrounded in
{%and%}which doesn’t resolve to text, and can be used for loops, conditionals, etc.Comments - any text surrounded in
{#and#}
Comprehensive documentation on Jinja2 templates can be found in the official template designer documentation.
The templating engine defines several global objects/variables that can be used in the query templates. The table below documents these objects; the Example column shows an example for 2-dimensional char data.
Important
the templating engine iterates over all dimensions in dimension_list and cell types in cell_type_name_list, and renders the template for each pair.
Variable |
Description |
Example |
Default |
|---|---|---|---|
Dimensionality |
|||
dimension_max |
Max dimension tested |
4 |
4 |
dimension_list |
All tested dimensions |
[1, 2, 3, 4] |
|
dimension |
Curr. dimension |
2 |
one of dimension_list |
Cell type |
|||
cell_type_name_list |
All tested cell types |
[boolean, octet, char, ushort, short,
ulong, long, float, double, complex,
complexd, char_char_char
short_float]
|
|
cell_type_name |
Curr. cell type |
char |
one of cell_type_name_list |
cell_type_suffix_dic |
Cell type -> constant suffix |
{‘octet’: ‘o’, ‘char’: ‘c’, …} |
|
cell_type_suffix |
Curr. cell type suffix |
c |
cell_type_suffix_dic[cell_type_name] |
cell_type_min_dic |
Cell type -> min value |
{‘octet’: ‘-128’, ‘char’: ‘0’, …} |
|
cell_type_min |
Min for curr. cell type |
0 |
cell_type_min_dic[cell_type_name] |
cell_type_max_dic |
Cell type -> max value |
{‘octet’: ‘127’, ‘char’: ‘255’, …} |
|
cell_type_max |
Max for curr. cell type |
255 |
cell_type_max_dic[cell_type_name] |
cell_type_val_dic |
Cell type -> non-edge value |
{‘octet’: ‘-13’, ‘char’: ‘33’, …} |
|
cell_type_val |
Value for curr. cell type |
33 |
cell_type_val_dic[cell_type_name] |
cell_type_size_dic |
Cell type -> cell size (B) |
{‘octet’: 1, ‘char’: 1, …} |
|
cell_type_size |
Size for curr. cell type |
1 |
cell_type_size_dic[cell_type_name] |
cell_type_signed_dic |
Cell type -> is signed |
{‘octet’: True, ‘char’: False, …} |
|
cell_type_signed |
Is curr. cell type signed |
False |
cell_type_signed_dic[cell_type_name] |
cell_type_components _dic |
Cell type -> comp. name/type pairs |
{‘char_char_char’: [(‘b0’,’char’)
(‘b1’,’char’),(‘b2’,’char’)], …}
|
|
cell_type_components |
Components for curr. cell type |
[] |
cell_type_components_dic[cell_type_name] |
Coll/Mdd type |
|||
coll_name_dic |
(dim,cell type) -> coll name |
{(1,’octet’): ‘test_1d_octet’,
(2,’char’): ‘test_2d_char_set’, …}
|
|
coll_name |
Curr. coll name |
test_2d_char |
‘test_’ + dimension + ‘d_’ + cell_type_name |
coll_type_name_dic |
(dim,cell type) -> coll type |
{(1,’octet’): ‘test_1d_octet_set’,
(2,’char’): ‘test_2d_char_set’, …}
|
|
coll_type_name |
Curr. coll type name |
test_2d_char_set |
coll_name + ‘_set’ |
mdd_type_name_dic |
(dim,cell type) -> mdd type |
{(1,’octet’): ‘test_1d_octet_mdd’,
(2,’char’): ‘test_2d_char_mdd’, …}
|
|
mdd_type_name |
Curr. mdd type name |
test_2d_char_mdd |
coll_name + ‘_mdd’ |
MDD constants |
|||
mdd_constant_cell_count |
Number of cells in mdd constants |
16 |
16 |
mdd_constant_extents _list |
dimension -> sdom extents |
[[], [16], [4,4], [2,2,4], [2,2,2,2]] |
|
mdd_constant_extents |
dim extents for curr. dim |
[4,4] |
mdd_constant_extents_list[dimension] |
mdd_constant_sdom_list |
dimension -> sdom |
[‘’, ‘[0:15]’, ‘[0:3,0:3]’,
‘[0:1,0:1,0:3]’, ‘[0:1,0:1,0:1,0:1]’]
|
|
mdd_constant_sdom |
sdom for curr. dim |
‘[0:3,0:3]’ |
mdd_constant_sdom_list[dimension] |
mdd_constant_cell _values_dic |
cell type -> cell values |
{‘char’: [‘0c’,’0c’,’255c’,’1c’,
‘99c’,’9c’,’109c’,’2c’,’5c’,’12c’,
‘23c’,’45c’,’123c’,’123c’,
‘234c’,’250c’], …}
|
|
mdd_constant_cell_values |
cell values for curr. cell type |
[‘0c’,’0c’,
‘255c’,’1c’,
‘99c’,’9c’,
‘109c’,’2c’,
‘5c’,’12c’,
‘23c’,’45c’,
‘123c’,’123c’,
‘234c’,’250c’]
|
mdd_constant_cell_values_dic[cell_type_name] |
mdd_constant_dic |
(dim,cell type) -> mdd |
{(2,’char’): ‘<[0:3,0:3] 0c,0c,255c,1c;
99c,9c,109c,2c;5c,12c,23c,45c;
123c,123c,234c,250c>’, …}
|
|
mdd_constant |
mdd constant for curr. dim/cell type |
‘<[0:3,0:3]
0c,0c,255c,1c;
99c,9c,10c,2c;
5c,12c,23c,
45c;123c,123c,
234c,250c>’
|
mdd_constant_dic[(dimension,cell_type_name)] |
Operations |
|||
oper_induced_unary |
Unary induced ops |
[+,-,not] |
|
oper_induced_unary_name |
Unary induced op names |
[plus,minus,not] |
|
oper_induced_binary |
Binary induced ops |
[+,-,*,/,overlay,is,and,or,xor,
=,<,>,<=,>=,!=,]
|
|
oper_induced_binary_name |
Binary induced op names |
[plus,minus,multiplication,division,
overlay,is,and,or,xor,
equals,less,greater,lessorequal,
greaterorequal,notequal]
|
|
oper_condense_op |
Condense operators |
[+,*,and,or,max,min] |
|
oper_condense_name |
Condense op names |
[plus,multiplication,and,or,max,min] |
|
Functions |
|||
func_induced_unary |
Unary induced functions |
[sqrt,abs,exp,log,ln,sin,cos,tan,
sinh,cosh,tanh,arcsin,asin,
arccos,acos,arctan,atan]
|
|
func_induced_binary |
Binary induced functions |
[pow,power,mod,div,bit,
max,min,complex]
|
|
func_condense |
Condensers |
[max_cells,min_cells,all_cells,
some_cells,count_cells,add_cells,
avg_cells,var_pop,var_samp,
stddev_pop,stddev_samp]
|
|
Other |
|||
separator |
Instantiation sep. |
‘===’ |
|
template_name |
Template file name |
e.g. ‘setup’ (extension is removed) |
|
test_id |
Unique test id |
template_name + “_” + dimension + “d_” +
cell_type_name
|
|
In addition, the following functions can be used in the templates:
Function |
Description |
Example |
|---|---|---|
is_atomic_cell_type(type) |
return true if type is an atomic cell type |
is_atomic_cell_type(‘char’) -> True |
is_complex_cell_type(type) |
return true if type is a complex cell type |
is_complex_cell_type(‘complexd’) -> True |
is_composite_cell_type(type) |
return true if type is a composite cell type |
is_composite_cell_type(‘short_float’) -> True |
3.5.3.1. Template instantiation
The template instantiation engine is a script rasqte.py that takes a
template file as an input and produces a concrete output file.
3.5.3.1.1. Rendered templates
The rendered concrete file will have many instantiations of one
template. Each instantiation ends with a separator line (=== by
default):
Each instantiated_query has this format: The id is used to compare the
result of evaluating the query to an oracle file named id. id and
query are mandatory, any other parameters are optional.
3.5.3.2. Concrete test evaluation
A systemtest script test.py then reads a concrete file and evaluates
the tests, comparing to the expected oracle values.
The following directories are used by the script:
queries- contains the rendered templates (outputs ofrasqte.py)outputs- results of evaluating tests in queries are saved in this directory. For rasql queries two file types are saved:any file outputs (produced by rasql as
--out fileis specified) intemplate name.file*filesstdout, stderr, and exit code from running the program in a
template namefile
oracles- similar structure asoutputsdirectory, it contains the expected files against which the outputs are compared.
setup and teardown tests files in queries dir are treated specially:
setup is evaluated first, before any others, and teardown is evaluated
at the end. This allows to import data for the test, and drop it at the end, for
example.
3.5.3.3. Examples
3.5.3.3.1. Create collection
Template:
CREATE COLLECTION {{ coll_name }} {{ coll_type_name }}
Engine instantiates 4 x 13 = 52 queries (4 for dimensions [1, 2, 3, 4] and 13 for cell types [boolean, char, octet, short, unsigned short, long, unsigned long, float, double, complex, complexd, char_char_char, short_float]:
rasql -q 'CREATE COLLECTION test_1d_boolean test_1d_boolean_set' --out file
rasql -q 'CREATE COLLECTION test_1d_char test_1d_char_set' --out file
rasql -q 'CREATE COLLECTION test_1d_octet test_1d_octet_set' --out file
...
rasql -q 'CREATE COLLECTION test_4d_short_float test_4d_short_float_set' --out file
3.5.3.3.2. Insert literal array
Template:
INSERT INTO {{ coll_name }} VALUES {{ mdd_constant }}
Instantiation:
rasql -q 'INSERT INTO test_1d_boolean VALUES ...' --out file
rasql -q 'INSERT INTO test_1d_char VALUES ...' --out file
...
rasql -q 'INSERT INTO test_3d_RGBPixel VALUES ...' --out file
The mdd_constant is constructed of 16 values that contain edge values
(min/max) and other “interesting” values, like 0, nan, inf, etc.
3.5.3.3.3. Select: sin(array)
Template:
select sin(c) from {{coll_name}} as c
Instantiation:
rasql -q 'select sin(c) from test_2d_char as c' --out file
...
3.5.3.3.4. Select: sin(scalar)
Template:
select sin( {{cell_max}}{{cell_type_suffix}} )
Instantiation:
rasql -q 'select sin( 255c )' --out file
...
3.5.3.3.6. Drop data
Template:
drop collection {{coll_name}}
Instantiation:
rasql -q 'drop collection test_2d_char as a' --out file
...
3.5.4. Running tests locally
Uploading a patch to the patchmanager will automatically trigger a jenkins build that applies the patch on master and runs the systemtest. The jenkins testing is done on several OS in parallel: Ubuntu 20.04 and Ubuntu 22.04.
You can run the systemtest directly on your installation. But sometimes it can be useful to replicate the same environment as in the jenkins tests, as the patch may be causing some discrepancies across different OS. The steps below show how to replicate the jenkins test on your machine; required dependencies are rasdaman installer and vagrant.
The directory where the Vagrantfile sits is mounted in the VM at path
/vagrant. The ./run_vm.sh script copies the installer in this directory,
so it’s possible to update the installer code or
profiles/test/systemtest.toml file to apply a local patch file for example
instead of specifying a patch id to be downloaded from the patchmanager. After
such changes, it is necessary to reload the VM in order to get the updated files
in its /vagrant dir. This can be done with vagrant reload --provision in
the VM directory (where the Vagrantfile is). Example follows below.
Instead of testing a single VM, it’s possible to run the testing in parallel on
all supported VMs (ubuntu2004, ubuntu2204). It’s similar steps as
before, except instead of ./run_vm.sh we execute ./test_installer.sh;
the argument is the command which will be executed in the
/vagrant/rasdamaninstaller directory on each VM:
./test_installer.sh "./ci_test.sh systemtest.toml $branch $patch_id"
3.5.5. Check Jenkins log files
When you upload a patch to the patchmanager,
the systemtest is automatically executed on several different
virtual machines (VM) on Jenkins. If a patch failed on a VM, Jenkins will send
an email to the patch’s author, for example: the patch below failed
on Ubuntu 16.04 VM with build number 3439:
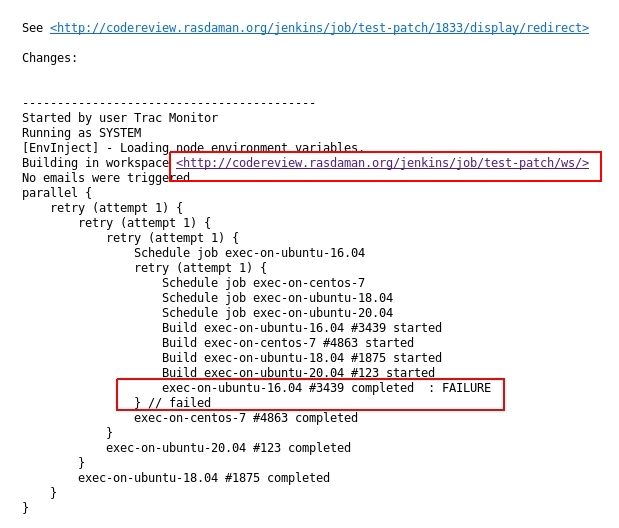
Then, one needs to access Jenkins at the link in the email
(http://codereview.rasdaman.org/jenkins/job/test-patch/ws/)
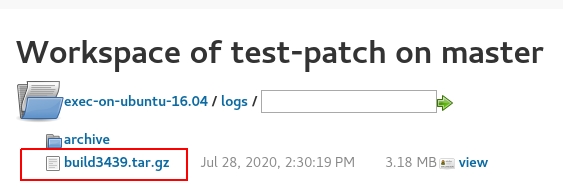
and click on the failed Ubuntu 16.04 VM:
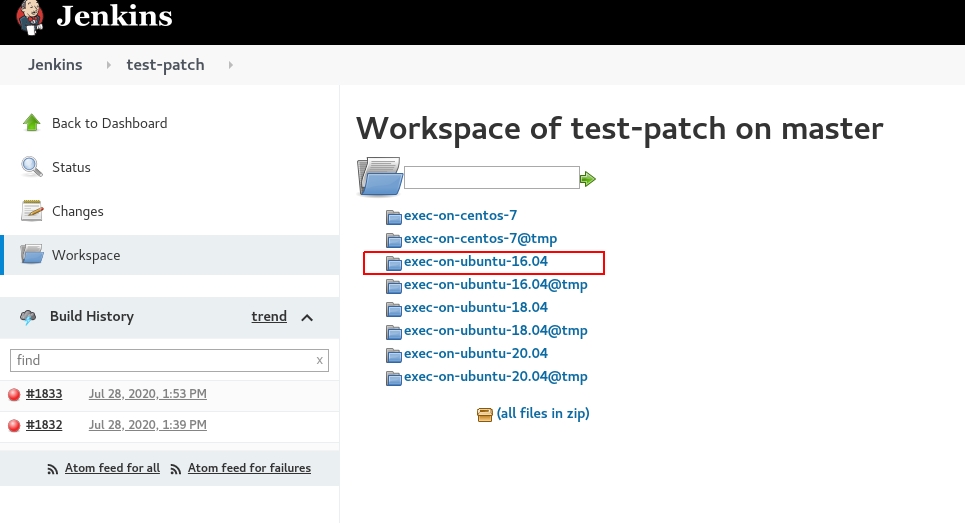
Select the logs folder:
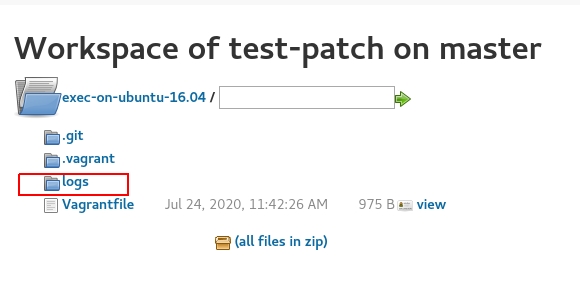
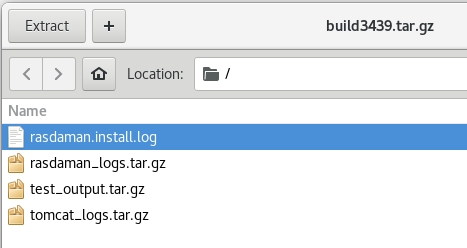
and download the compressed file with the failed build number 3439
to the local system:
Extract the downloaded archive (build3439.tar.gz) and check the
rasdaman.install.log file:
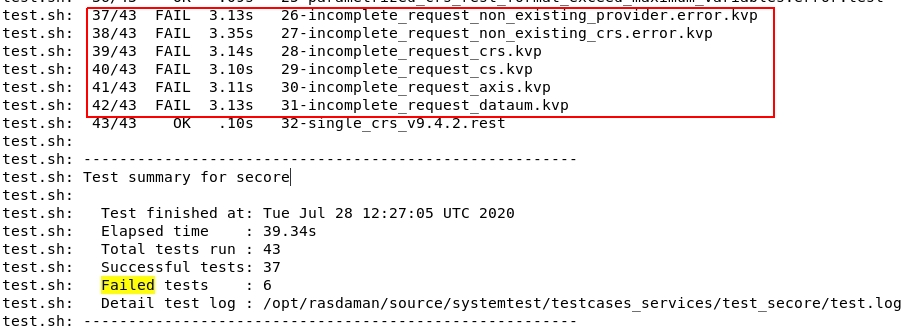
Search for Fail test cases in rasdaman.install.log file, e.g:
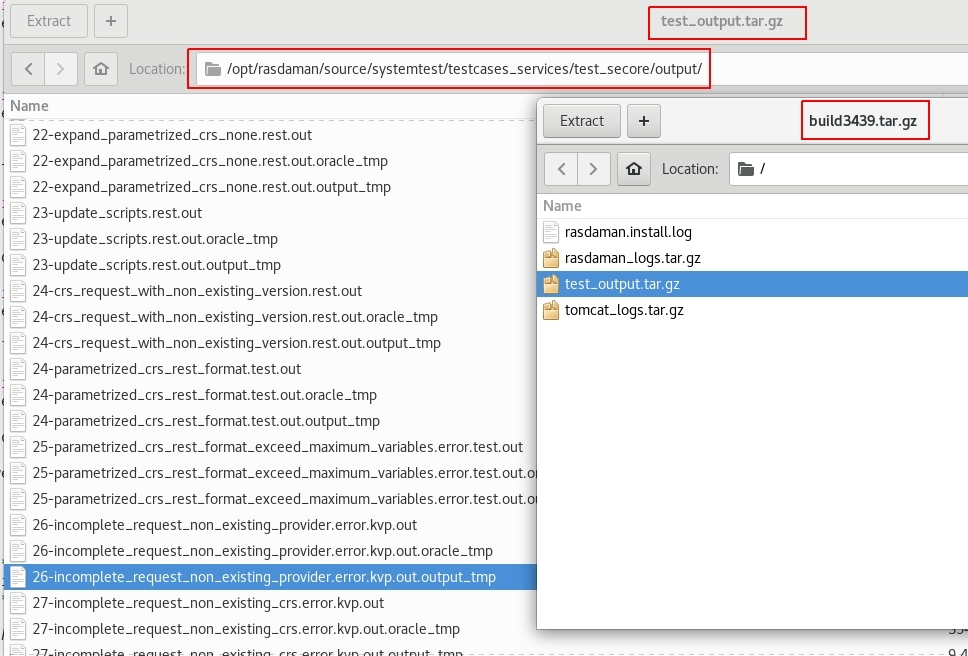
Then, check the ouput of these failed tests in test_output.tar.gz archive
which is in build3439.tar.gz to compare the differences between oracle files
and output files:
3.6. rasdaman Code Guide
Don’t expect others to clean up your code
An open-source project is fun, but it requires a great deal of discipline to make all the code seamless that is coming from the developers worldwide. If everybody just follow their individual coding style - no matter how ingenious the code is - then the whole project will soon become unmaintainable.
To avoid this, rasdaman provides this code guide - don’t worry, it contains as few rules as possible, just enough to achieve overall coherence. Although written for C++, mutatis mutandis it applies to Java, Javascript, and even scripts.
Rules that have to be fulfilled strictly.
Recommendations which serve as suggestions for a ‘better’ coding style.
Examples to show how code should be written according to the guidelines.
Please understand that, while we always highly appreciate your contributions, we may have to reject your patch if it breaks this code guide. Your successors looking at the code will be most grateful for your efforts.
Credits: This code guide has been established by the rasdaman team based on the codeguide originally developed by Roland Ritsch who in turn has crafted it along the style guide of ELLEMTEL/Norway. Any eventual error is ours, of course.
3.6.1. Rules
Rule 0: Every time a rule is broken, this must be clearly documented.
—
Rule 1: Include files in C++ must have a file name extension .hh.
Rule 2: Implementation files in C++ must have a file name extension .cc.
Rule 3: Inline definition files must have a file name extension .icc.
Rule 4: Every file must include information about its purpose, contents, and copyright. For this purpose, the several standard headers are provided here. Adjust the copyright to your name / instituion as deemed adequate. All code must use a GPL header, except for files in the raslib/, rasodmg/, and rasj/ directories, which must use an LGPL header.
Rule 5: All method definitions must start with a description of their functionality using the standard method header.
Rule 6: All comments must be written in English.
—
Rule 7: Every include file must contain a mechanism that prevents multiple inclusions of the file.
Rule 8: Never use path name in #include directives. Only use relative
paths and the parent path (..) is not allowed.
Rule 9: Never have indirect inclusion of a function. Collective include files are allowed.
—
Rule 10: The names of variables and functions must begin with a lowercase letter. Multiple words must be written together, and each word that follows the first starts with an uppercase letter (Camel Casing).
Rule 11: The names of constants must be all uppercase letters, words must be separated by underscores (“_”).
Rule 12: The names of abstract data types, structures, typedefs, and enumerated types must begin with an uppercase letter. Multiple words are written together and each word that follows the first is begun with an uppercase letter (Camel Casing).
—
Rule 13: The public, protected, and private sections of a class must be declared in that order (the public section is declared before the protected section which is declared before the private section). See the standard class definition for details.
Rule 14: No member functions within the class definition include file. The only exception are inline functions.
Rule 15: No public or protected member data in a class. Use public inline
methods (setVariable() and getVariable()) to access private member data.
Rule 16: A member function that does not affect the state of an object (its instance variables) must be declared const.
Rule 17: If the behavior of an object is dependent on data outside the object, this data must not be modified by const member functions.
—
Rule 18: A class which uses new to allocate instances managed by the
class must define a copy constructor.
Rule 19: All classes which are used as base classes and which have virtual function, must define a virtual destructor.
Rule 20: A class which uses new to allocate instances managed by the
class must define an assignment operator.
Rule 21: An assignment operator which performs a destructive action must be protected from performing this action on the object upon which it is operating.
—
Rule 22: A public member function must never return a non-`const` reference or pointer to member data.
Rule 23: A public member function must never return a non-const
reference or pointer to data outside an object, unless the object shares the
data with other objects.
—
Rule 24: Do not use unspecified function arguments (ellipsis notation).
Rule 25: The names of formal arguments to functions must be specified and are to be the same both in the function declaration and in the function definition.
—
Rule 26: Always specify the return type of a function explicitly. If no value is returned then the return type is void.
—
Rule 27: A function must never return a reference or a pointer to a local variable.
Rule 28: Do not use the preprocessor directive #define to obtain more
efficient code; instead, use inline functions.
—
Rule 29: Constants must be defined using const or enum; never use
#define.
Rule 30: Do not use numeric values directly in the code; use symbolic values instead (Use constants for default values). Always document the meaning of the value.
—
Rule 31: Variables must be declared with the smallest possible scope. Do not use global variables.
Rule 32: Never declare multiple variables in the same line.
Rule 33: Every variable that is declared must be given a value before it is used.
Rule 34: Don’t use implicit type conversions.
Rule 35: Never cast an object to a virtual class.
Rule 36: Never convert a const to a non-const.
—
Rule 37: The code following a case label must always be terminated by a
break statement.
Rule 38: A switch statement must always contain a default branch
which handles unexpected cases.
Rule 44: Never use goto.
—
Rule 45: Do not use malloc, realloc or free, but use new and
delete. In general, use C++, not C code.
Rule 47: Always provide empty brackets ([]) for delete when
deallocating arrays.
Rule 48: Use C++ exception handling (try/catch) for every possible failure situation.
—
Rule 49: When submitting a patch, describe concisely in the commit message what has been accomplished in the patch. In case of a fix, include in the message the ticket# fixed and place a comment in the source file at the location the fix was done mentioning the ticket (best by its URL).
3.6.2. Recommendations
Recommendation 1: Optimize code only if you know that you have a performance problem. Think twice before you begin.
Recommendation 2: Eliminate all warnings generated by the compiler.
Recommendation 3: An include file should not contain more than one class declaration.
Recommendation 4: Place machine-dependent code in a special file so that it may be easily located when porting code from one machine to another.
Recommendation 5: Always give a file a name that is unique in as large a context as possible.
Recommendation 6: An include file for a class should have a file name of the form + .hh. Use all lowercase letters.
Recommendation 7: Use the directive #include “filename.hh” for user-prepared include files.
Recommendation 8: Use the directive #include for include files from system libraries.
Recommendation 9: Choose names that suggest the usage. Don’t give generic names to variables.
Recommendation 10: Encapsulate global variables and constants, enumerated types, and typedefs in a class.
Recommendation 11: Always provide the return type of a function explicitly on a separate line, together with template or inline specifiers.
Recommendation 12: When declaring functions, the leading parenthesis and the first argument (if any) are to be written on the same line as the function name. If space permits, other arguments and the closing parenthesis may also be written on the same line as the function name. Otherwise, each additional argument is to be written on a separate line (with the closing parenthesis directly after the last argument).
Recommendation 13: Always write the left parenthesis directly after a function name (no blanks). Use ‘astyle –style=allman -c -n’ for autoformatting your code.
Recommendation 14: Braces ({ }) which enclose a block are to be placed in
the same column as the outer block, on separate lines directly before and after
the block. Use indentation of four spaces and don’t use tab stops. Use astyle
--style=allman -c -n for autoformatting your code.
Recommendation 15: The reference operator * and the address-of operator &
should be directly connected with the type names in declarations and
definitions. Use astyle --style=allman -c -n for autoformatting your code.
Recommendation 16: Do not use spaces around . or ->, nor between unary
operators and operands. Use astyle --style=allman -c -n for autoformatting
your code. Got it? ;-)
Recommendation 17: An assignment operator should return a const reference.
Recommendation 18: Use references instead of pointers whenever possible.
Recommendation 19: Use constant references (const &) instead of call-by-value, unless using a pre-defined data type or a pointer.
Recommendation 20: Avoid long and complex functions.
Recommendation 21: Avoid pointers to functions.
Recommendation 22: Pointers to pointers should be avoided whenever possible.
Recommendation 23: Use a typedef to simplify program syntax when declaring function pointers.
Recommendation 24: Always use unsigned for variables which cannot reasonably have negative values.
Recommendation 25: Always use inclusive lower limits and exclusive upper limits.
Recommendation 26: Avoid the use of continue.
Recommendation 27: Do not write logical expressions of the type if (test) or
if (!test) when test is a pointer.
Recommendation 28: Use parentheses to clarify the order of evaluation for operators in expressions.
Recommendation 29: Do not allocate memory and expect that someone else will deallocate it later.
Recommendation 30: Always assign NULL to a pointer after deallocating memory.
Recommendation 31: Check the return codes from library functions even if these functions seem foolproof.
Recommendation 32: If possible, always use initialization instead of assignment. To declare a variable that has been initialized in another file, the keyword extern is always used.
Recommendation 33: Avoid implicit type conversions (casts).
Recommendation 34: Use all flavors of const as often as possible.
3.6.3. Examples
3.6.3.8. Recomendation 12
Correct:
inline int
getLenght()
{
    ...
}
Wrong:
inline int getLenght()
{
    ...
}
3.6.3.9. Macros vs inline functions
Wrong:
#define SQUARE(x) ((x)*(x))         // wrong
int a = 2
int b = SQUARE(a++)                 // a == 6
Right:
inline int
square( int x );                    // right
{
  return (x*x)
}
int c = 2;
int d = square(c++);                // d == 4
3.6.3.10. Constants vs Standalone Values
Wrong:
if (iterations <= 0)
    iterations = 5;
Correct:
// Default number of iterations in units
const int defaultIterationsNumber = 5;

...

if (iterations <= 0)
    iterations = defaultIterationsNumber;
3.6.3.11. Macros vs const variables
#define BUFSIZE 7            // no type checking

const int bufSize = 7        // type checking takes place

enum  size { BufSize = 7 };  // type checking takes place
3.6.3.12. Standard Method Declaration
/**
* Description of addNumbers
* @param n1 the first argument.
* @param n2 the second argument.
* @return The return value
*/
template <class P>
int
addNumbers(int n1, int n2)
{
    ...
}
3.6.3.13. Case statement
switch(tag)
{
  case A:
    // do something
    // break is missing and foo() is also called in case A    // wrong

  case B:
    foo();
    // do something else
    break;

  default:
    // if no match in above cases, this is executed
    break;
}
3.6.3.14. Dynamic array allocation and deallocation
int n = 7
T* myT = new T[n];  // T is type with defined constructors and destructors

//........

delete myT;         // No! Destructor only called for first object in array a.
delete [10] myT ;   // No! Destructor called on memory out of bounds in array a.
delete [] myT ;     // OK, and always safe.
3.6.3.15. Standard Class Definition
Example class definitions in accordance with the style rules
class String : private Object
{
public:
    String();
    String(const String&);
    unsigned getLenght() const;
    inline Encoding getEncoding() const;
    inline void setEncoding(Encoding newEncoding);

protected:
    int checkIndex( unsigned index ) const;

private:
    unsigned noOfChars;
    Encoding encoding;

};
Wrong:
class String
{
  public:
    int getLength() const // No !!
    {
      return length;
    };

  private:
    int length;
};
Correct:
class String
{
  public:
    int getLength() const;

  private:
    int length;
};

inline int
String::getLength() const
{
  return len ;
}
3.6.3.16. Classes with dynamic member data
Declaration examples of the assignment operator:
MySpezialClass&
MySpezialClass::operator= (const MySpezialClass msp);     // no

void
MySpezialClass::operator= (const MySpezialClass msp);     // well

const MySpezialClass&
MySpezialClass::operator= (const MySpezialClass msp);     // recommanded

Class definition

class DangerousBlob
{
  public:
    const DangerousBlob& operator=(const DangerousBlob& dbr);

  private:
    char* cp;
};
Definition of assignment operator:
const DangerousBlob&
DangerousBlob::operator=(const Dangerous& dbr)
{
  if ( this != &dbr )          // Guard against assigning to the "this" pointer
  {
    // ...
    delete cp;                 // Disastrous if this == &dbr
    // ...
  }
}
Constant references as return types:
class Account
{
  public:
    Account ( int myMoney ): moneyAmount(myMoney) { };
    const int& getSafemoney()  const { return moneyAmount;};
    int&       getRiskyMoney() const { return moneyAmount;};  // no

  private:
     int moneyAmount;
};

Account myAcc(10);
myAcc.getSafeMoney()  += 100000;  // compilation error: assignment to constant
myAcc.getRiskyMoney() += 1000000; // myAcc::moneyAmount = 1000010 !!
Note
Method definition within the class definition is forbidden by rule.
3.6.3.17. Parameter declaration
int setPoint( int, int )     // wrong
int setPoint( int x, int y )

int
setPoint( int x, int y )
{
  //....
}
3.6.3.18. Return type
int
calculate ( int j )
{
  return 2*j;
}

void
noReturnType( char* xData, char* yFile)
{
  //....
}
3.6.3.19. Include directive
// file is PrintData.cc

#include "PrintData.hh"    // user include file

#include <iostream.h>      // include file of the system library
3.6.3.20. Avoid global data
class globale
{
  public:
    //........

  protected:
    const char* functionTitle = "good style";

    int   constGlobal;
    char* varGlobal;
}
3.6.3.21. Formating of functions
void foo (); // no
void foo();  // better

// right
int
myComplicateFunction( unsigned unsignedValue,
                      int intValue
                      char* charPointerValue );

// wrong
int myComplicateFunction (unsigned unsignedValue, int intValue char* charPointerValue);
3.6.3.22. Formating of pointer and reference types
char*
object::asString()
{
  // something
};

char* userName = 0;
int   sfBlock  = 42;
int&  anIntRef = sfBlock;
3.6.3.23. Assignment operator
MySpezialClass&
MySpezialClass::operator=( const MySpezialClass& msp ); // no

const MySpezialClass&
MySpezialClass::operator=( const MySpezialClass& msp ); // recommended
3.6.3.24. Reference vs pointer
// Unnecessarily complicated use of pointers
void addOneComplicated ( int* integerPointer )
{
  *integerPointer += 1:
}
addOneComplicated (&j)


// Write this way instead
void addOneEasy ( int& integerReference )
{
  integerReference +=1:
}
addOneEasy(i);
3.6.3.25. Call-by-value vs call-by-constant-reference
// this may lead to very inefficient code.
void foo( string s );
string a;
foo(a)               // call-by-value

// the actual argumment is used by the function
// but it connot be modified by the function.
void foo( const string& s );
string c;
foo(c);              // call-by-constant-reference
3.6.3.26. Avoid continue
while ( /* something */ )
{
  if (/* something */)
  {
    // do something
    continue;                // Wrong!
  }
  // do something
}

// By using an extern 'else' clause, continue is avoided and the code
// is easier to understand

while ( /* something */ )
{
  if (/* something */)
  {
    // do something
  }
  else
  {
    // do something
  }
}
3.6.3.27. Parentheses
// Interpreted as (a<b)<c, not (a<b) && (b<c)
if (a<b<c)
{
  //...
}

// Interpreted as a & (b<8), (a&b) <8
if (a & b<8)
{
  //..
}

// when parentheses are recommended
int i = a>=b && c < d && e+f <= g+h;        // no
int j = (a>=b)&&(c<d) && (( e+f) <= (g+h)); // better
3.6.3.28. Include Files
Include file for the class PackableString:
#ifndef PACKABLESTRING_HH
#define PACKABLESTRING_HH

#include "string.hh".
#include "packable.hh".

/**
 * A test class with elaborate description.
/*

class Buffer:public String:public Packable
{
  public:
    class PackableString (const String& s);
    class Buffer* put (class Buffer* outbuffer);
    //.......
};

#endif
Implementation file for the class PackableString:
// PackableString.cc
// not recommanded <../include/iostream.h> Wrong

#include <iostream.h> // Right
#include "PackableString.hh"
// to be able to use Buffer instances, buffer.hh must be included.
#include "buffer.hh"

Buffer*
PackableString::put(Buffer* outbuffer)
{
    //......
}
3.7. Geo services
3.7.1. Petascope Developer’s Documentation
3.7.1.1. Introduction
This page serves as an introduction to the petascope component from a developer’s perspective (see also Geo Services Guide).
Petascope is built on the Spring Boot Framework with Hibernate as object relational mapping data model for backend-communication with petascopedb; Implements support for the Coverage Schema Implementation (CIS version 1.0: GridCoverage, RectifiedGridCoverage and ReferenceableGridCoverage and CIS version 1.1: GeneralGridCoverage which is the unified class for coverage types in CIS 1.0).
Petascope can be deployed on more backend DBMS beside PostgreSQL like HSQLDB, H2, etc. Postgresql is still the most stable database for deploying petascope, but the user can switch to other databases by changing the configuration in petascope.properties.
The Spring Boot Framework provides many utilities that aid in quicker development of petascope. Petascope can now start as an embedded web application with an internal embedded Tomcat (i.e: no need to deploy to external Tomcat).
3.7.1.2. Code organization
Petascope is divided in 3 applications:
core contains the classes to generate petascopedb’s tables by Hibernate with Liquibase and other utilities classes. This is the core library used by other petascope’s applications.
main contains the classes to handle WCS, WCPS, WMS, WCST-T requests and generates rasql queries for rasdaman. This is the rasdaman.war application to be deployed to external Tomcat or started in embedded mode with
java -jar rasdaman.war.migration handles petascopedb migration (must need when updating from v9.4 to v9.5+) using Liquibase; it can also migrates petascopedb from Postgresql to another DBMS like H2 or HSQLDB.
3.7.1.3. Database migration
3.7.1.3.1. Schema migration
To support different kinds of databases, we use **Liquibase**, which creates the changes for each update in XML and uses that to generate the SQL statements for the target database (e.g: Postgresql, HSQLDB, H2, etc). To further understand how Liquibase works to populate database tables, see comments in the liquibase.properties config file. and list of existing schema versions files.
Note
Do not edit existing changelog files in
applications/petascope/petascope_main/src/main/resources/database_versions/. Whenever a change in petascopedb is required a new changelog file must be created.If you modify a changelog file that has already been applied to petascopedb, Liquibase will throw a checksum error while petascope is starting and prevent startup. To resolve this, delete the corresponding row from the
databasechangelogtable and restart Tomcat so Liquibase can apply the updated changelog.As modifying changelog files is very problematic, it is important to test them thoroughly for any possible issues before publishing.
3.7.1.3.2. Data migration
This feature is invoked in some cases, for example: existing data need to be corrected or newly data need to be populated in newly created tables by Liquibase.
For each data migration version, there must have one java class to handle, these classes are added in
org.rasdaman.datamigrationpackage and extendsAbstractDataMigrationHandlerabstract class. Each handler class should have an incrementalmigrationVersionproperty (1-based) and an uniquehandlerId(generated byuuidcommand tool).When petascope starts, from the list of all handlers, for each handler, it checks if the
handlerIdexists in columnapplied_migration. If it does not exists, this handler will run the migration and insert itshandlerIdas a new row in tableapplied_migration.
3.7.1.4. CRS management
Petascope relies on a SECORE Coordinate Reference System (CRS) resolver that can provide proper metadata on a coverage’s native CRS. One can either deploy a local SECORE instance, or use the official OGC SECORE resolver at http://www.opengis.net/def/.
It currently keeps a few internal caches, especially for SECORE CRS resources and responses: the gain is both on performance and on robustness against network latencies. Caching information about CRSs is safe as CRSs can be considered static resources - normally they do not change (and with the CRS versioning recently introduced by OGC a particular CRS version never will change indeed).
It is suggested to run a WCS GetCapabilities after a fresh new deployment, so that the CRS definitions of all the offered coverages are cached: after that single request, mainly almost all the CRS-related information has already been cached.
The CrsUtil class serves several purposes:
CRS definitions: the relevant information parsed from a GML CRS definition is stored as a CrsDefinition object. This includes both spatial and temporal reference systems;
CRS equivalence tests: thanks to the
/equalendpoint of SECORE, effective equivalence (no simple string comparison) between two reference systems can be verified. This operation is required when checking if a CRS has been cached or not: as an example, KVP notation of a CRS URI is independent of the order of key/value pairs, so that http://www.opengis.net/def/crs?authority=EPSG&version=0&code=32633 and http://www.opengis.net/def/crs?version=0&authority=EPSG&code=32633 are equivalent despite their different URI identifier.
3.7.1.5. Testing
The systemtest/testcase_services covers all the possible cases for WCS, WCPS, WMS and WCS-T. The easiest way to understand how Petascope works is by running some tests and debug it with your IDE (e.g: NetBeans, IntelliJ IDEA,…).
For instance: send this request in Web Browser with deployed petascope in Tomcat:
http://localhost:8080/rasdaman/ows?service=WCS&version=2.0.1&request=GetCapabilities.
Then you can set a debug in class petascope.controller.PetascopeController
of petascope-main application, then follow all following classes when debugging
to understand how the request is handled inside petascope.
3.7.1.6. Development & Debugging
After one has downloaded rasdaman source code and compiled it successfully (see detail), you can load the petascope code in an IDE like NetBeans and run/debug it during development.
In the below examples, NetBeans IDE version 8.2 will be used for demonstration.
Open the NetBeans IDE and locate the source code of petascope from the rasdaman source tree in
applications/petascope: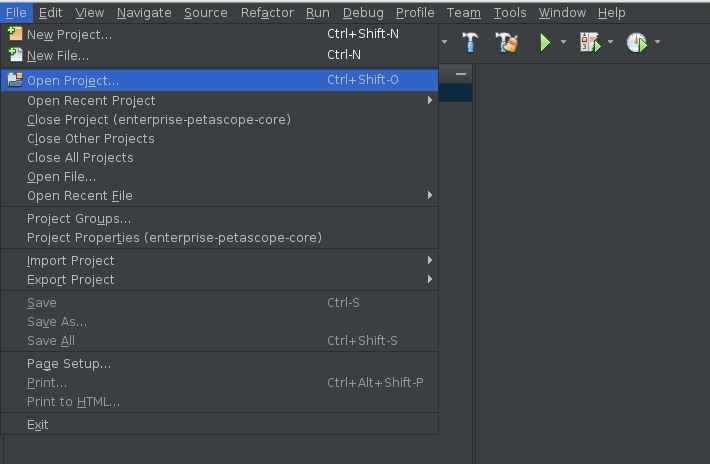
Select the two petascope sub-projects:
petascope_coreandpetascope_main: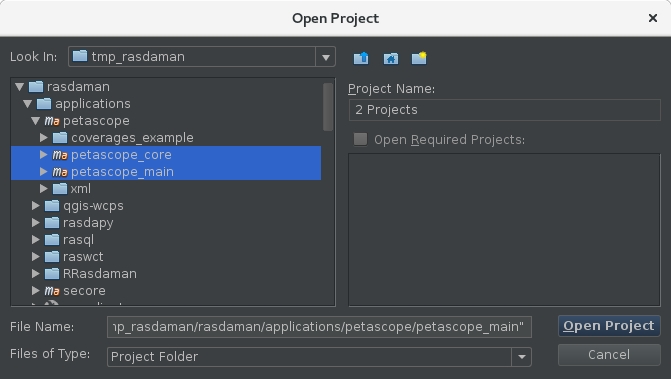
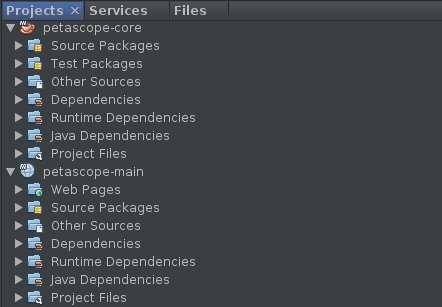
Now the projects should display on the left panel:
Next, change directory on terminal to
petascope_mainsource code location:cd applications/petascope/petascope_mainRun petascope application as a standalone web application with embedded Tomcat and Tomcat will listen on port
5005for debugging. Petascope will start at the port configured in/opt/rasdaman/etc/petascope.properties, settingserver.port(e.g8090).mvn spring-boot:run -Drun.jvmArguments="-Xdebug -Xrunjdwp:transport=dt_socket,server=y,suspend=n,address=5005"
Next, attach the debugger from NetBeans to the embedded Tomcat:
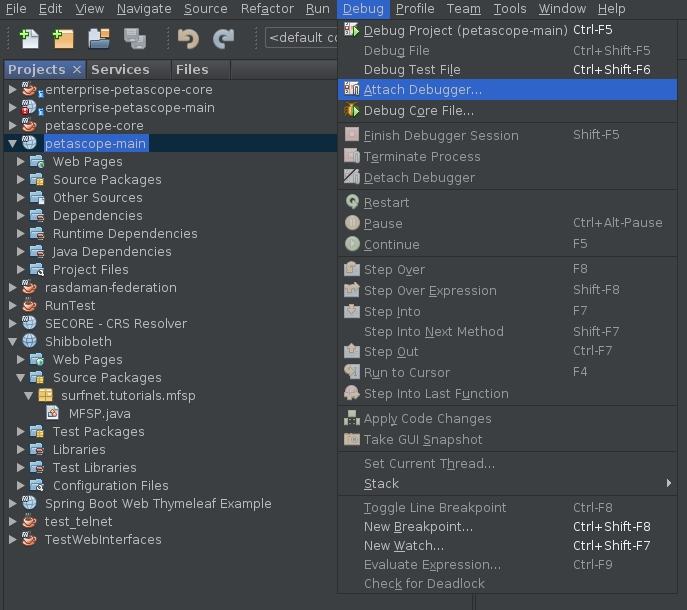
Input the debugging port
5005which was used to start embedded Tomcat above: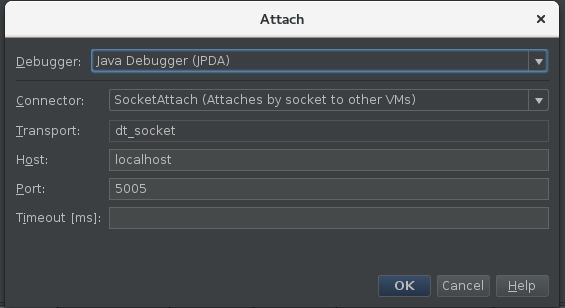
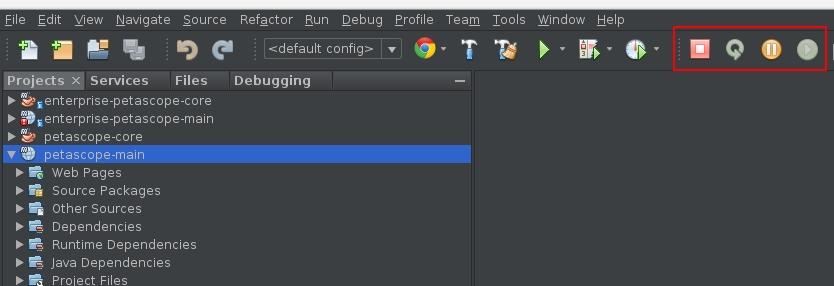
After that, NetBeans will show the panel with control buttons for debugging:
Add a test break point by clicking on the number in the middle panel, for example: in
petascope-mainproject, classPetascopeController, line154: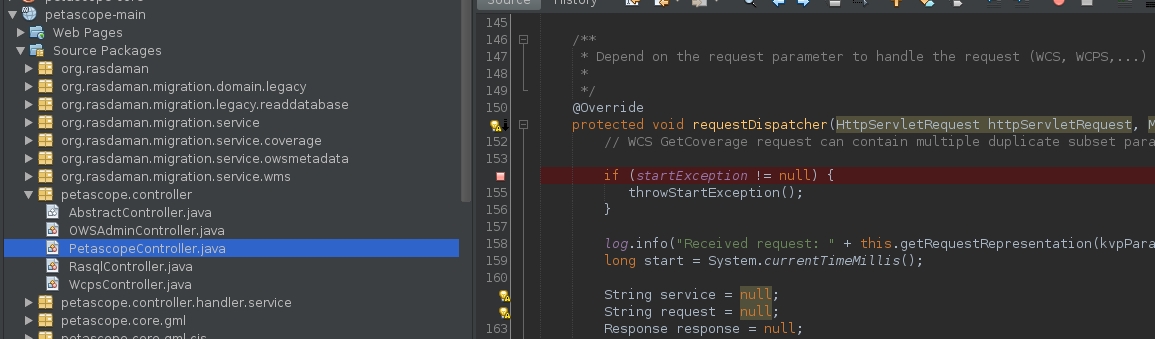
Then, open this embedded petascope endpoint
http://localhost:8090/rasdaman/owson web browser and see NetBeans stops petascope application at the selected line above for inspecting and debugging: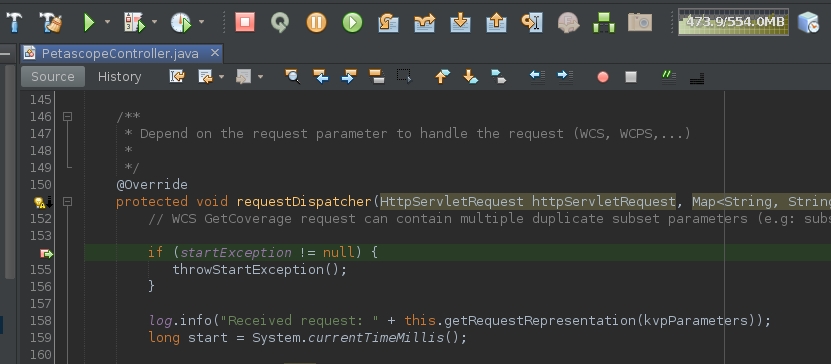
Furthermore, you can step with the debugger, see variable values, continue execution, etc.
3.7.1.7. Warnings
Don’t create BigDecimal directly from a double variable,
rather from double.toString().
E.g. BigDecimal a = new BigDecimal(0.2356d) will result with random
fraction numbers after the real value
of double (0.235653485834584395929090423904902349023904290349023904);
subsequently this would lead to wrong coefficient calculation in petascope.
3.7.2. WSClient Developer’s Documentation
3.7.2.1. Introduction
WSClient is a frontend Web application which facilitates interactions from users to petascope (OGC WCS/WCPS/WMS standards implementation). It it based on the AngularJS framework version 1.4 with other libraries like CSS Bootstrap and WebWorldWind to make a single page application.
When building petascope, WSClient is added to rasdaman.war, which is then deployed to Tomcat. For example, in Tomcat 9 / Ubuntu 18.04 the WSClient can be found in this directory:
/var/lib/tomcat9/webapps/rasdaman/WEB-INF/classes/public/ows/
3.7.2.2. Code
WSClient uses TypeScript rather JavaScript directly. To compile WSClient, the following dependencies are necessary:
npm - Node package manger:
# CentOS
$ sudo yum install npm
# Debian / Ubuntu
$ sudo apt-get install npm
tsc - Used for compiling TypeScript .ts files to JavaScript .js:
$ sudo npm install -g tsc
Everytime a new feature/fix is added, one needs to compile from TypeScript to
JavaScript to work in Web Browsers with the following command in WSClient source
folder (application/wcs-client/app):
$ tsc
This will generate two important files in application/wcs-client/app/ows:
main.js and main.js.map. They need to be included in the patch besides
other added/updated files.
3.7.3. SECORE Developer’s Documentation
3.7.3.1. Introduction
SECORE (Semantic Cordinate Reference System Resolver) is a server which resolves CRS URLs into full CRS definitions represented in GML 3.2.1. Offical SECORE of rasdaman is hosted at: http://www.opengis.net/def.
Same as Petascope, SECORE builds on Spring framework. However, as it is an XML database resolver (mainly all CRSs are occupied from EPSG releases), hence it does not rely on any relational database as petascopedb.
3.7.3.2. Code
SECORE stores and queries XML data in a BaseX XML database. On the disk
this database is stored in $CATALINA_HOME/webapps/secoredb
(e.g: /var/lib/tomcat/webapps), this is the directory where
external Tomcat process will typically have write access.
The database is created and maintained automatically, so no action by the user
is required regarding this.
In SECORE, there are 2 types of GML Database (UserDictionary.xml and GmlDictionary.xml). User will add/update/delete CRSs only in UserDictionary.xml when GmlDictionary.xml comming from EPSG releases are intact.
SECORE database tree can be viewed and (upon login) modified via graphical web interface at “http://your.server/def/index.jsp”.
More generally, any folder and definition can turn to EDIT mode by appending a /browse.jsp to its URI: e.g. “http://your.server/def/uom/EPSG/0/9001/browse.jsp” will let you view/edit EPSG:9001 unit of measure, whereas “http://your.server/def/uom/EPSG/0/browse.jsp” will let you either remove EPSG UoM definitions or add a new one, not necessarily under the EPSG branch: the gml:identifier of the new definition will determine its position in the tree.
As explained in the `related publication <http://link.springer.com/chapter/10.1007%2F978-3-642-29247-7_5>`_, SECORE supports parametrization of CRSs as well: with this regard, you should mind that relative XPaths are not allowed (either start with / or // when selecting nodes); non-numeric parameters must be embraced by single or double quotes both when setting optional default values in the definition or when setting custom values in the URI.
3.7.3.3. Update new EPSG version
When EPSG announces a new release, one can download the new GML dictionary file from this link: http://www.epsg-registry.org.
From the downloaded .zip file, extract GmlDictionary.xml file inside and add it
to SECORE secore database
under a folder with version name (e.g: 9.4.2/GmlDictionary.xml).
After that, build SECORE normally to have a new web application def.war and redeploy it to Tomcat server. Finally, check if a new EPSG version is added from http://your.server/def/EPSG/. Example:
<identifiers xmlns="http://www.opengis.net/crs-nts/1.0"
   xmlns:gco="http://www.isotc211.org/2005/gco"
   xmlns:gmd="http://www.isotc211.org/2005/gmd"
   at="http://localhost:8080/def/crs/EPSG/">
   <identifier>http://localhost:8080/def/crs/EPSG/0</identifier>
   <identifier>http://localhost:8080/def/crs/EPSG/8.5</identifier>
   <identifier>http://localhost:8080/def/crs/EPSG/8.9.2</identifier>
   <identifier>http://localhost:8080/def/crs/EPSG/9.4.2</identifier>
</identifiers>
3.7.4. wcst_import Developer’s Documentation
Development is best done by opening applications/wcst_import/ in the
PyCharm IDE. It is recommended to install pylint as follows:
pip3 install pylint=2.13.4
Then it will be automatically executed when you do make to build rasdaman,
or manually do make pylint.check in applications/wcst_import/. It uses
the configuration file applications/wcst_import/pylint.cfg to customize the
execution.
In pycharm one can install the pylint plugin, and set the
applications/wcst_import/pylint.cfg file as configuration file. If the
plugin does not work as expected, pylint can be setup as an External Tool and
manually invoked as needed.