2. Installation and Administration Guide
2.1. Preface
2.1.1. Overview
This guide provides information about how to use the rasdaman array database system, in particular: installation and system administration.
For storage of multi-dimensional array data, rasdaman can be configured to use some conventional database system (such as PostgreSQL) or use its own storage manager. For the purpose of this documentation, we will call the conventional database system to which rasdaman is interfaced the base DBMS, understanding that this base DBMS is in charge of all alphanumeric data maintained as relational tables or object-oriented semantic nets.
This guide is specific for rasdaman community; for rasdaman enterprise (what’s the difference?) contact rasdaman GmbH.
2.1.2. Audience
The information in this manual is intended primarily for database and system administrators.
2.1.3. Rasdaman Documentation Set
This manual should be read in conjunction with the complete rasdaman documentation set which this guide is part of. The documentation set in its completeness covers all important information needed to work with the rasdaman system, such as programming and query access to databases, guidance to utilities such as raswct, release notes, and additional information on the rasdaman wiki.
2.2. Getting Started
There are several ways to ride rasdaman - installing from source, installing prefabricated RPM/DEB packages, or downloading a preconfectioned Virtual Machine. Make your choice below!
Hardware & Software Requirements
It is recommended to have at least 8 GB main memory. Disk space depends on the size of the databases, as well as the requirements of the base DBMS of rasdaman chosen. The footprint of the rasdaman installation itself is around 400 MB.
In order to download, build, and run rasdaman, various tools and libraries are required. This varies depending on the mode of installation (Official Packages or Build From Source Manually). Some packages, such as HDF4, are optional. This means that the feature (e.g. support for the HDF4 data format) is not available unless its use is specified during configuration. See Download and Install rasdaman for more information on the cmake configure parameters.
Rasdaman is continuously tested on the platforms listed below. The rasdaman code has been developed on SUN/Solaris and HP-UX originally, and has been ported to IBM AIX, SGI IRIX, and DEC Unix - but that was way back in the last millennium.
Ubuntu 20.04, 22.04, 24.04
In general, compiling rasdaman should work on distributions with gcc 9.3 or later and Java 11 or later.
Alternative 1: Packages
Get preconfectioned packages for installing RPM-based systems on CentOS or Debian-based systems on Debian / Ubuntu; this is the recommended way - among others because the package manager will be able to manage your installation.
Alternative 2: Guided Build
Download and compile rasdaman with the help of an automated installer. On supported operating systems this option works automatically out of the box, but also allows to easily adjust the build and install procedures by editing a configuration file. As such it is mainly aimed at non-developers who would like to customize their rasdaman installation to something different than the official packages.
Alternative 3: Source Code
Download and compile rasdaman; this is the most flexible alternative; however, it requires some experience in manual compilation and is generally done by developers who plan to contribute code to the rasdaman repository.
Alternative 4: Virtual Machine
By downloading a Virtual Machine you get a fully configured system with rasdaman installed and ready to run. This alternative does not require any system administration skills other than starting the VM and working with the rasdaman services, e.g., via the OGC standards based geo service interface.
Support
Installation information, FAQs, and troubleshooting information is available on www.rasdaman.org.
For support in installing rasdaman and any other question you may contact rasdaman GmbH at www.rasdaman.com.
2.2.1. Official Packages
This page describes installation of rasdaman RPM or Debian packages.
During generation of these packages, some configuration decisions have been made (which can be chosen freely when compiling from source). Most importantly, the rasdaman engine in the packages uses embedded SQLite for managing its array metadata. Notice, though, that the geo service component, petascope, currently still relies on a PostgreSQL database; this is planned to be changed in the near future.
2.2.1.1. Debian-based systems
Currently the following Debian-based distributions are supported:
Ubuntu 20.04 / 22.04 / 24.04
2.2.1.1.1. Installation
Import the rasdaman repository public key to the apt keychain:
$ wget -O - https://download.rasdaman.org/packages/rasdaman.gpg | sudo apt-key add -Note
You may need to update the ca-certificates package to allow SSL-based applications (e.g.
apt-get updateorwget/curl) to check for the authenticity of SSL connections:$ sudo apt-get install ca-certificates
Add the rasdaman repository to apt. There are three types of packages:
stable: these packages are only updated on stable releases of rasdaman, and hence recommended for operational production installations.
testing: updated more frequently with beta releases, so aimed for feature testing in non-critical installations.
nightly: updated nightly, so that they have the latest patches. It is not recommended to use these packages in a production installation as things could sometimes break.
rasdaman can be installed now:
$ sudo apt-get update
$ sudo apt-get install rasdaman
If during the install you get a prompt like the below, type N (default option):
Configuration file `/etc/opt/rasdaman/petascope.properties'
 ==> Modified (by you or by a script) since installation.
 ==> Package distributor has shipped an updated version.
   What would you like to do about it ?  Your options are:
    Y or I  : install the package maintainer's version
    N or O  : keep your currently-installed version
      D     : show the differences between the versions
      Z     : start a shell to examine the situation
 The default action is to keep your current version.
*** petascope.properties (Y/I/N/O/D/Z) [default=N] ?
If you are automating the installation (in a script for example), you can bypass this prompt with an apt-get option as follows:
$ apt-get -o Dpkg::Options::="--force-confdef" install -y rasdaman
You will find the rasdaman installation under
/opt/rasdaman/. Finally, to make rasql available on the PATH for your system user:$ source /etc/profile.d/rasdaman.sh
Check that the rasdaman server can answer queries:
$ rasql -q 'select c from RAS_COLLECTIONNAMES as c' --out stringTypical output:
rasql: rasdaman query tool v1.0, rasdaman v10.0.0 -- generated on 26.02.2020 08:44:56.
opening database RASBASE at localhost:7001...ok
Executing retrieval query...ok
Query result collection has 0 element(s):
rasql done.
Check that petascope is initialized properly, typically at this URL:
http://localhost:8080/rasdaman/ows
2.2.1.1.2. Updating
The packages are updated whenever a new rasdaman version is released. To update your installation:
$ sudo apt-get update
$ sudo service rasdaman stop
$ sudo apt-get install rasdaman
Note
You may need to update the ca-certificates package to allow SSL-based applications
like wget/curl to check for the authenticity of SSL connections:
$ sudo apt-get install ca-certificates
2.2.1.2. RPM-based systems
Currently no RPM-based distributions are supported.
If an RPM-based OS must be used, then one way to install rasdaman is to setup the latest Ubuntu LTS in a VM or a docker container and install rasdaman packages in it. Alternatively rasdaman can be compiled from source.
2.2.1.3. Customizing the package installation
When installing or updating rasdaman from the official packages, the process can be optionally customized with an installation profile (see example installer configuration).
To customize when installing rasdaman for the first time, it is necessary to first download the package install profile from here.
When updating an existing rasdaman installation, you can find the default package install profile in your installation at
/opt/rasdaman/share/rasdaman/installer/profiles/package/install.toml.
Download / copy the install.toml file to some place, e.g.
$HOME/rasdaman_install.toml, and make any desired changes to it before
installing or updating rasdaman. Make sure that the RAS_INSTALL_PATH
environment variable is set to point to the custom profile, e.g.
export RAS_INSTALL_PATH="$HOME/rasdaman_install.toml"
When you install or update rasdaman afterwards, the configuration process will take the custom profile into account instead of the default one.
2.2.1.4. Running rasdaman
A rasdaman service script allows to start/stop rasdaman, e.g.
$ service rasdaman start
$ service rasdaman stop
$ service rasdaman force-stop
$ service rasdaman status
It can be similarly referenced with systemctl, e.g.
$ systemctl start rasdaman
$ systemctl stop rasdaman
$ systemctl status rasdaman
The service script can be customized by updating environment variables in
/etc/default/rasdaman (create the file if it does not exist). The default
settings can be seen below.
See also the dedicated pages on configuration and log files and administration.
Check this section on how to start / stop the petascope component of rasdaman.
2.2.2. Build From Source Guided
The rasdaman installer tool allows users to install rasdaman on a machine through a single script which wraps and hides all the details of manual compilation - it can’t be easier than that! And it is safe: you can inspect the script and see what’s happening. Plus, you retain full control over your configuration by simply editing a JSON file.
Currently, the following distributions are supported:
Debian (9, 10)
Ubuntu (16.04, 18.04, 20.04, 22.04, 24.04)
CentOS (7)
2.2.2.1. First-Time Installation
Download the installer and execute it:
$ wget https://download.rasdaman.org/installer/install.sh
$ bash install.sh
This creates a vanilla installation in /opt/rasdaman using
reasonable default configurations from /tmp/rasdaman-installer/profiles/installer/default.toml
(see the installer configuration page for more details).
Note that the script needs sudo rights for installing rasdaman into its
proper system directory (/opt/rasdaman) and for installing package
dependencies.
2.2.2.2. Updating an Existing Installation
Updating a rasdaman installation (if established with the installer) is just as easy:
$ update_rasdaman.sh
That is all, follow the instructions on the screen and you should be done.
Note
The updating feature of the installer has been introduced more recently. If you have an older installer on your system, please follow the steps for first-time installation after manually stopping rasdaman.
2.2.2.3. Creating Your Own Profile
The installer makes use of a configuration file, installer_profile.toml,
created during first-time rasdaman installation and reused during updates. While
reasonable defaults are built in, settings can be tweaked by editing the TOML
file.
After establishing this file in e.g.
/opt/rasdaman/share/rasdaman/installer/install_profile.toml, apply it
through
$ ./install.sh -j /opt/rasdaman/share/rasdaman/installer/install_profile.toml
2.2.3. Build From Source Manually
This section outlines the procedure for downloading and installing rasdaman from scratch.
2.2.3.1. Preparation
2.2.3.1.1. Create Dedicated User
While rasdaman can be installed and run under any operating system user, for security reasons it is strongly recommended to create a dedicated user to shield rasdaman activity (e.g., log files) from the rest of the system.
This user can be named rasdaman, but any other (pre-existing or newly
established) user will do as well; in this case, adjust the commands
listed in the sequel where necessary. In the sequel it will be assumed
that a user account named rasdaman has been created, e.g. with
$ sudo adduser rasdaman
and that you are logged in as user rasdaman, e.g. with this command:
$ sudo -u rasdaman -i
Warning
The dollar sign (“$”) symbolizes the command line prompt and is not to be typed in.
Note
As user rasdaman probably does not have sudo rights,
make sure to execute the commands that require sudo with a user that has
sudo rights.
2.2.3.1.2. Create Installation Directory
$RMANHOME is the target directory where rasdaman will be installed; by
default this directory is /opt/rasdaman. Make sure it exists and the
rasdaman user has write access to it:
$ export RMANHOME=/opt/rasdaman
$ mkdir -p $RMANHOME
$ chown rasdaman: $RMANHOME
2.2.3.1.3. Install Required Packages
build tools:
git – needed to clone the rasdaman git repository
cmake – for generating the makefiles needed to compile rasdaman
make, libtool, pkg-config – general tools needed to configure and compile rasdaman
flex, bison, g++, libstdc++ – required for compilation of the C++ codebase
unzip, curl – for compiling 3rd party dependencies of rasnet (grpc and protobuf)
maven2, OpenJDK 7+ – required for compilation of the Java code (Java client API, petascope OGC frontend, SECORE)
general libraries:
libssl-dev, libedit-dev, libreadline-dev, libboost-dev (v1.48+), libffi-dev – required for various system tasks
libgdal-dev – required for data format support (TIFF, JPEG, PNG, etc.)
database stuff: Pick one option below for rasdaman storage:
libsqlite, libsqlite-dev, sqlite3 – required for storing arrays in a filesystem directory and the rasdaman technical metadata in SQLite; see details; note that petascope currently requires PostgreSQL independently from the PostgreSQL / file system array decision - in other words: even if for the array engine you chose to not use PostgreSQL you currently still need to install it for storing the geo metadata making an array an OGC coverage)
libecpg-dev, postgresql – required for PostgreSQL to hold rasdaman arrays and/or petascope geo metadata
optional packages:
libnetcdf-dev, python-netcdf4 – required for NetCDF support
libeccodes-dev, libgrib2c-dev – for GRIB data support
libhdf4-dev – required for HDF4 support
libtiff-dev, libjpeg-dev, ligpng-dev - internal encoder/decoder implementations for TIFF, JPEG, or PNG formants.
libdw-dev / elfutils-devel – for segfault stacktraces, useful in development
sphinx, sphinx_rtd_theme, latexmk, texlive – main HTML / PDF documentation
doxygen – generate C++ API documentation
r-base, r-base-dev – required for Initialize R support, an R package providing database interface for rasdaman
performance boosters and additional service components offered by rasdaman GmbH
geo data support (optional):
Tomcat (or another suitable servlet container) – required for running the petascope and SECORE Java web applications, unless they are configured to start in standalone mode
python3 – Python 3.6+ to run wcst_import <data-import>, a tool for importing geo-referenced data into rasdaman / petascope
python3-pip, python3-setuptools, python3-wheel – required to install Python dependencies for wcst_import
python-dateutil, lxml, numpy, netCDF4, GDAL, pygrib, jsonschema – Python 3 dependencies for wcst_import, best installed with pip3
Installation commands for the packages is depending on the platform used, here is a guidance for some of the most frequently used.
Note
When installing the GDAL Python bindings with pip3 install --user GDAL==...,
it is possible to come across an error similar to
cpl_port.h: No such file or directory. To fix it, search for cpl_port.h
on your system, e.g. find / -name cpl_port.h; normally it will be in
/usr/include/gdal. Then retry the same pip3 command installing only GDAL,
with additional --global-option arguments:
$ pip3 install --user --global-option=build_ext \
                      --global-option="-I/usr/include/gdal" GDAL==...
Ubuntu 22.04
Note
Two files - gdal.jar and libgdalalljni.so, are absent in Ubuntu 22.04.
You need to manually paste gdal.jar at /usr/share/java and
libgdalalljni.so at /usr/lib/jni/ for a successful build.
You can find these files here: https://download.rasdaman.org/installer/tpinstaller/ubuntu2204/
Ubuntu 24.04
Note
Two files - gdal.jar and libgdalalljni.so, are absent in Ubuntu 24.04.
You need to manually paste gdal.jar at /usr/share/java and
libgdalalljni.so at /usr/lib/jni/ for a successful build.
Furthermore, the GDAL package has a bug
which prevents petascope from working correctly; it can be fixed by copying
libgdal.so.34.3.8.4 to /usr/lib/x86_64-linux-gnu/.
You can find these files here: https://download.rasdaman.org/installer/tpinstaller/ubuntu2404/
2.2.3.2. Download and Install rasdaman
2.2.3.2.1. Download
You can get a complete rasdaman Community distribution from www.rasdaman.org by executing the following command:
$ git clone git://rasdaman.org/rasdaman.git
This will create a sub-directory rasdaman in your current working directory.
2.2.3.2.2. Configure
Change into the newly cloned directory:
$ cd rasdaman
Optionally, select a tagged stable release. To activate a particular tagged version use its name prefixed with a “v”, e.g:
$ git checkout v9.8.1
Note
You can list all tags with git tag.
The following commands will prepare for building on your system. First create a build directory:
$ mkdir -p build
$ cd build
In the build directory we next execute cmake to configure how rasdaman
is compiled. A typical configuration looks like this:
$ cmake .. -DCMAKE_INSTALL_PREFIX=$RMANHOME
Any missing components will be reported; if this is the
case, then install the missing packages and retry configuration. The ..
indicates the path to the rasdaman source tree, which is now the parent
directory of the build directory in which the cmake command is executed.
The general format of invoking cmake on the command-line is as follows:
$ cmake /path/to/rasdaman/sources [ -D<option>... ]
Note
Alternatively, ccmake or cmake-gui can be used as graphical interfaces for this configuration step.
Configuration can be customized, Table 2.1 summarizes the options
that can be specified with -D<option>, along with the default settings.
Note
To get a current list of all the custom options that can be passed to
cmake on the command line, try cmake -LH.
Option |
Alternatives |
Description |
|---|---|---|
|
<path> (default /opt/rasdaman) |
Installation directory. |
|
Release / Debug |
Specify build type, Release for production, Debug for development |
|
ON / OFF |
Enable this if you need detailed output from the make process. |
|
<flags> |
Specify additional compiler options, e.g. -DCMAKE_CXX_FLAGS=”-g3” |
|
sqlite / postgresql |
Specify the DBMS that rasdaman uses for storing RASBASE. |
|
ON / OFF |
Generate binaries that contain extra code for benchmark output. |
|
ON / OFF |
Enable profiling of queries with google-perftools. |
|
ON / OFF |
Generate (slower) binaries that can be debugged / produce debug logs. |
|
ON / OFF |
Compile with AddressSanitizer enabled (-fsanitize=address) |
|
ON / OFF |
Enable compilation in strict mode (warnings terminate compilation). |
|
ON / OFF |
Enable compilation of R support. |
|
ON / OFF |
Generate and install documentation (manuals, doxygen, javadoc). |
|
ON / OFF |
Generate and install documentation in PDF format. |
|
ON / OFF |
Generate position independent code (PIC). |
|
ON / OFF |
Generate and install of Java-based components (rasj, petascope, secore). |
|
embedded / external |
Set the Java application deployment mode. |
|
ON / OFF |
Build SECORE as a standalone web application .war. |
|
ON / OFF |
Enable inclusion of GDAL library during installation. Further variables
can be set to control the GDAL paths: |
|
ON / OFF |
Enable inclusion of GRIB library during installation. Further variables
allow controlling the GRIB library paths: |
|
ON / OFF |
Enable inclusion of HDF4 library during installation. Further variables
allow controlling the HDF4 library paths: |
|
ON / OFF |
Enable inclusion of netCDF library during installation. Further variables
allow controlling the netCDF library paths: |
|
ON / OFF |
Enable compilation of internal TIFF encoder/decoder. Further variables
allow controlling the TIFF library paths: |
|
ON / OFF |
Enable compilation of internal PNG encoder/decoder. Further variables
allow controlling the PNG library paths: |
|
ON / OFF |
Enable compilation of internal JPEG encoder/decoder. Further variables
allow controlling the JPEG library paths: |
|
ON / OFF |
Enable building for CPUs with SSE4.2 support (adds -msse, -msse2, -msse3, -mssse3, -msse4, -msse4.1, and -msse4.2, to the compiler options). |
|
ON / OFF |
Enable building for CPUs with AVX support (adds -mavx to the compiler options). |
|
ON / OFF |
Enable building for CPUs with AVX2 support (adds -mavx, -mavx2, -mfma, to the compiler options). |
|
ON / OFF |
Enable building for CPUs with AVX-512 support (adds -mavx, -mavx2, -mfma, -mavx512f, -mavx512cd, -mavx512vl, -mavx512dq, and -mavx512bw to the compiler options). |
|
<path> (default $RMANHOME/data) |
The path where the server stores array tiles as files. |
|
<path> (default $RMANHOME/share/ rasdaman/war) |
The path where Java war files will be installed. |
2.2.3.2.3. Build
Next, execute make to compile and link rasdaman:
$ make -j2
Note
Compiling rasdaman can take awhile. -j2 sets make to compile in parallel
with 2 threads; it’s recommended to increase this number to match the number
of cores on your system (check with the nproc command).
To further improve the compilation speed, especially if you’re recompiling rasdaman often, it can be helpful to install ccache.
2.2.3.2.4. Install
Install rasdaman to the directory specified before with
-DCMAKE_INSTALL_PREFIX:
$ make install
Note
The user executing this command must have write access to the
target directory specified. If -DWAR_DIR was specified, then it also
needs to have write access to this directory. Information on enabling
this without using sudo can be found in the Preparation
Section.
As described in the previous section, the installation directory is chosen at
compile time. Inside this installation directory we find the binary executable
programs, development libraries, documentation, etc. (covered in more detail in
Section Installed Files and Data). For your convenience you can add the
executable path location to the $PATH definition, e.g:
$ export RMANHOME=/opt/rasdaman
$ export PATH=$RMANHOME/bin:$PATH
This allows to invoke rasql without specifying the full path
/opt/rasdaman/bin/rasql.
Note
This only takes effect in the current terminal. To preserve them accross
shell sessions, these settings can be appended to the ~/.bashrc file.
Note
All paths inside rasdaman scripts and binaries are adjusted automatically during generation, so you do not need to edit any script.
2.2.3.2.5. Update rasdaman
In order to be able to update your working installation in future, it is best to keep the cloned rasdaman repository along with the build directory. Otherwise updating would require following the same steps from the beginning.
Skip to the next section if this is the first time your installing rasdaman. This section is only applicable if you already have a running, functional instance of rasdaman on your system.
To update, first change to the rasdaman source tree which was cloned in the first step, and run the following command:
$ git pull
If you haven’t changed any source files, the command should execute successfully and download the latest changes in the rasdaman repository since the last time you cloned or updated the repository.
Next, the build and
install steps need to be repeated.
However, rasdaman should be stopped before, and started afterwards, so that the
updated installation is fully reflected in the running system. In addition,
the database schema of rasdaman may need to be updated with the update_db.sh
command. In summary:
$ make -j2

$ stop_rasdaman.sh

$ make install
$ update_db.sh

$ start_rasdaman.sh
2.2.3.3. Initialize rasdaman
2.2.3.3.1. Create Relational Database
For the default SQLite based backend of rasdaman it is just necessary to
make sure that the rasdaman user has read/write/executable access to the
data directory specified with -DFILE_DATA_DIR or the environment
variable $RASDATA.
For PostgreSQL it is necessary to make sure that rasdaman can login and is able
to create databases and tables. Currently ident-based authentication is
supported. A PostgreSQL user named as the operating system user under which
rasdaman will be operated (e.g. rasdaman as recommended above) needs to be
created, e.g:
$ sudo -u postgres createuser -s rasdaman
2.2.3.3.2. Database Initialization
The create_db.sh script creates and initializes a rasdaman database named
RASBASE by instantiating a set of standard types in rasdaman. It has no
parameters and is invoked as:
$ create_db.sh
Note
The rasdaman server should be stopped when running this command.
2.2.3.3.3. Server Configuration (Optional)
Rasdaman is a multi-server multi-user system. The server processes
available must be configured initially, which is done in file
$RMANHOME/etc/rasmgr.conf. For distribution, this configuration contains ten
server processes going by a name like, for example, N1. If this is fine
then you can just leave it as it is. If you want to change this by
modifying server startup parameters or increasing the number of server
processes available then see rascontrol Invocation for details on how
to do this.
2.2.3.3.4. Server Start/Stop
Make sure that the ports rasdaman uses are not blocked in your system. These are 7001 for the scheduler (rasmrg) and 7002, 7003, etc. for each worker process. Ports used can be reconfigured, cf. Server Manager and Server.
Start rasdaman by invoking
$ start_rasdaman.sh
Note
Messages printed by start_rasdaman.sh will not always show the
detailed system state. If, for example, the rasdaman servers fail
to contact the base DBMS then nevertheless a message “Server
started” may appear.
Workaround: use this to get the actual server state, as user rasdaman:
$ rascontrol -e -x "list srv -all"
Correspondingly, rasdaman can be stopped by invoking
$ stop_rasdaman.sh
2.2.3.3.5. Demo Database
The rasdaman distribution contains a demo database which serves as a first test of successful installation.
Inserting demo data into the fresh database is done through
$ rasdaman_insertdemo.sh localhost 7001 \
  $RMANHOME/share/rasdaman/examples/images rasadmin rasadmin
Note that repeated invocations are not harmful - each of the sample collection will simply receive additional objects made of the same images.
After successful completion, you can check whether the three rasdaman collections containing the example images have been created through:
$ rasql -q "select r from RAS_COLLECTIONNAMES as r" \
        --out string
This command shows a list of all collections existing in the database.
There should be mr, mr2, and rgb.
Congratulations! At this point, if everything completed successfully, rasdaman is up and running and prepared for data definition, data import and retrieval, and any other suitable task.
2.2.3.4. Initialize geo service support
2.2.3.4.1. petascope
Petascope is the geo Web service frontend of rasdaman. It adds geo semantics on top of arrays, thereby enabling regular and irregular grids based on the OGC coverage standards.
Petascope gets installed automatically as rasdaman.war unless a
-DENABLE_JAVA=OFF (cf. Table 2.1) is
specified. The deployment directory of all war files can be set during
the configure step with the -DWAR_DIR=<DIR> cmake option;
by default this is $RMANHOME/share/rasdaman/war.
To implement the geo semantics, petascope uses a relational database for the geo-related metadata. Currently, PostgreSQL and H2 / HSQLDB are supported. When installing from packages, the package post-install script will automatically set up PostgreSQL for use by petascope. The steps approximately performed by the script are listed below.
PostgreSQL
PostgreSQL is automatically configured when rasdaman is installed, so doing the below is not usually necessary; we list the steps as documentation of how is PostgreSQL configured by default:
If postgres has not been initialized yet:
$ sudo service postgresql initdb
If the output is ‘Data directory is not empty!’ then this step is skipped.
Trust-based access in PostgreSQL is enabled by adding the below configuration before the ident lines to
/etc/postgresql/9.4/main/pg_hba.confon Debian 8, or/var/lib/pgsql/data/pg_hba.confon CentOS 7:host all petauser localhost md5 host all petauser 127.0.0.1/32 md5 host all petauser ::1/128 md5Reload PostgreSQL so that the new configuration will take effect:
$ sudo service postgresql reload
Add a petascope user, for example
petauser, to PostgreSQL:$ sudo -u postgres createuser -s petauser -P > enter password
In
$RMANHOME/etc/petascope.propertiesset thespring.datasource.username/spring.datasource.passwordandmetadata_user/metadata_passoptions accordingly to this user / password. The password is randomly generated.Copy
/opt/rasdaman/share/rasdaman/war/rasdaman.warto the Tomcat webapps directory (/var/lib/tomcat/webappson CentOS 7) and restart Tomcat.Following successful deployment, petascope accepts OGC W*S requests at URL
http://localhost:8080/rasdaman/ows.
H2 / HSQLDB
To alternatively set up H2 / HSQLDB for use by petascope instead of PostgreSQL:
Create a directory that will host petascopedb and the H2 driver:
$ mkdir /opt/rasdaman/geodb
Make sure the user running the webserver serving petascope can read/write to the folder above. For example, Tomcat webserver which uses tomcat user
$ sudo chown -R tomcat: /opt/rasdaman/geodb
However, if embedded deployment is enabled in petascope.properties, then the owner should be the
rasdamanuser which runs rasdaman$ sudo chown -R rasdaman: /opt/rasdaman/geodb
Download the driver and place it in the created directory. For example, download a H2 driver
$ cd /opt/rasdaman/geodb
$ wget https://repo1.maven.org/maven2/com/h2database/h2/1.4.200/h2-1.4.200.jar
Configure database settings in petascope.properties file, see details.
Restart the webserver running petascope (or rasdaman if embedded tomcat).
2.2.3.4.2. SSL/TLS configuration
Transport Layer Security (TLS) and its predecessor, Secure Sockets Layer
(SSL), are technologies which allow web browsers and web servers to
communicate over a secured connection. To configure it for petascope and
secore web applications for Tomcat, check the official guide.
2.2.3.5. Initialize R support
RRasdaman is an R package providing database interface for
rasdaman. This manual describes the installation process of the package.
Note
This package is still in beta. We are seeking contributors to finalize it and submit it to CRAN.
Install
R:$ sudo apt-get install r-base r-base-dev
Install needed
Rpackages; from theRprompt:$ R --quiet > install.packages(c("rJava", "testthat"))
In case an error
"/usr/bin/ld: cannot find -lpcre (-llzma, -lbz2)"appears, install the following system packages needed forrJava:$ sudo apt-get install liblzma-dev libbz2-dev libpcre3-dev
Make sure that rasdaman was configured with
-DENABLE_R=ONbefore proceeding.Build and install the
Rpackage, in the rasdaman build directory:$ cd applications/RRasdaman $ make $ make installStart rasdaman, then check from within an
Rsession that everything works:$ R > library(RRasdaman) > conn <- dbConnect(Rasdaman()) > dbListCollections(conn) [1] "mr" "rgb" [3] "mean_summer_airtemp" "eobstest" > dbDisconnect(conn)
Optionally, run the package tests. This also requires the rasdaman up and running:
$ cd applications/RRasdaman
$ make check
2.2.4. Preconfigured Virtual Machines
2.2.4.1. rasdaman @ OSGeo Live
A complete VM with all OSGeo certified tools, including rasdaman, is available for download at live.osgeo.org. Be aware that this installation relies on the OSGeo release cycle and, therefore, will usually not reflect the latest software state.
2.2.4.2. rasdaman vagrant boxes
The following vagrant boxes can be used to quickly setup a rasdaman test environment with vagrant:
rasdaman/ubuntu1804
rasdaman/ubuntu2004
rasdaman/centos7e
rasdaman/centos7e_gdal2
rasdaman is not installed, this can be done by following the guides for
installing rasdaman from a package or building from source.
All packages needed for building rasdaman are preinstalled and
the sources can be found in /opt/rasdaman/source (make sure
to git pull to get the latest version). In
/opt/rasdaman/third_party there is a cmake that can be used to
configure and build rasdaman. To build and install rasdaman, you can use
the rasdaman installer or
do it from scratch.
It is not required to use the rasdaman-specific boxes, you can use any box
published on the vagrant cloud
such as ubuntu/jammy64.
Here is a sample Vagrantfile for the Ubuntu 20.04 box:
To quickly get started:
$ sudo apt-get install vagrant
$ cd /location/of/Vagrantfile
$ vagrant up
$ vagrant ssh
Check the vagrant docs for further information.
2.3. Installed Files and Data
2.3.1. Top-level directories
As common with rasdaman, we refer to the installation location as $RMANHOME
below; the default is /opt/rasdaman. The table below lists the top-level
directories found in $RMANHOME after a fresh installation.
Directory |
Description |
|---|---|
|
rasdaman executables, e.g. rasql, start_rasdaman.sh, … |
|
Path where the server stores array tiles as files; this directory can get big, it is recommended to make it a link to a sufficiently large disk partition. |
|
Configuration files, e.g. rasmgr.conf |
|
C++ API development headers. |
|
C++ and Java API libraries. |
|
|
|
Various artefacts like documentation, python/javascript clients, example data, migration scripts, etc. |
2.3.2. Executables
Rasdaman executables are found in $RMANHOME/bin; the table below
lists the various binaries and scripts. More detailed information on these
components is provided in the Server Architecture Section.
Executables |
Description |
|---|---|
|
Client queries are evaluated by a |
|
A manager process that controls |
|
A command-line frontend for |
|
A rasserver that can execute queries directly, bypassing the client/server protocol; useful for debugging. |
|
A command-line client for sending queries to a |
|
Start |
|
Shutdown rasdaman, embedded petascope and embedded secore if enabled. More details here. |
|
Initialize the rasdaman metadata database (RASBASE). |
|
Applies migration scripts to RASBASE. |
|
Insert three demo collections into rasdaman (used in the rasdaman Query Language Guide). |
|
Insert geo-referenced demo coverage in petascope. |
|
Applies database migrations on petascopedb. More details here. |
|
Tool for convenient and flexible import of geo-referenced data into petascope. More details here. |
|
Helps preparing a report for an issue encountered while operating rasdaman. More details here. |
2.3.2.1. start_rasdaman.sh
This script starts rasdaman. Normally rasdaman is installed from packages, and
instead of executing this script directly one would execute service rasdaman
start. Any options to be passed on to start_rasdaman.sh can be set in
/etc/default/rasdaman in this case; see more details.
To start a specific service (rasdaman and embedded petascope) the
--service (core | petascope) option can be used(core refers to
rasmgr + rasserver only).
Since v10.0 the rasmgr port can be specified with -p, --port. Additionally,
for security and usability reasons, start_rasdaman.sh will refuse running
if executed with root user; this can be overriden if needed with the
--allow-root option.
The script will use various environment variables, if they are set before it is executed:
RASMGR_PORT- the port on which rasmgr will listen when started, and to which client applications will connect in order to send queries to rasdaman. This variable will be overrided by the value of option--port, if specified. By default if none are specified, the port is set to 7001.RASLOGIN- rasdaman admin credentials which will be used for starting rasmgr non-interactively. See more details on the format and how is this setting used here. If not set, the script defaults to using rasadmin/rasadmin credentials.JAVA_OPTS- options passed on to thejavacommand when used to start the OGC frontend of rasdaman (petascope) if it is configured for embedded deployment. If not set, it defaults to-Xmx4000m
Check -h, --help for all details.
2.3.2.2. stop_rasdaman.sh
This script stops rasdaman. Normally rasdaman is installed from packages, and
instead of executing this script directly one would execute service rasdaman
stop. Any options to be passed on to stop_rasdaman.sh can be set in
/etc/default/rasdaman in this case; see more details.
The script stops rasmgr, rasservers, rasfed, and petascope (if configured for
embedded deployment) in the correct order with a regular TERM signal to each
process; this ensures that the services exit properly. In some cases, a process
may be hanging instead of exiting on the TERM signal; since rasdaman v10.0,
stop_rasdaman.sh will detect and report such cases. It is prudent to then
check the relevant process logs, and if it appears that there is no reason for
the process hanging one can force-stop it with stop_rasdaman.sh --force, or
manually do it by sending it a KILL signal (e.g. kill -KILL <pid>).
To stop a specific service the --service (core | petascope ) option
can be used. Since v10.0 the rasmgr port can be specified with -p, --port.
The script will use various environment variables, if they are set before it is executed:
RASMGR_PORT- the port on which rasmgr was set to listen when it was started. This variable will be overrided by the value of option--port, if specified. By default if none are specified, the port is set to 7001.RASLOGIN- rasdaman admin credentials which will be used for stopping rasmgr non-interactively. See more details on the format and how is this setting used here. If not set, the script defaults to using rasadmin/rasadmin credentials.
Check -h, --help for all details.
2.3.2.3. migrate_petascopedb.sh
This script is used to migrate coverages imported by wcst_import, OWS Service metadata and WMS 1.3 layers. For more details see Meta Database Connectivity and Initialize geo service support.
There are 2 types of migration:
Migrate petascopedb v9.4 or older to a newer rasdaman version. After the migration, the old petascopedb is backed up at petascope_94_backup.
Migrate petascopedb v9.5 or newer to a different database name or different database (e.g. PostgreSQL to HSQLDB).
Note
The petascope Web application must not be running (e.g in Tomcat) while migrating to a different database (type 2 above) to protect the existing data integrity.
The script will use various environment variables, if they are set before it is executed:
JAVA_OPTS- options passed on to thejavacommand when used to start embedded petascope to migrate. If not set, it defaults to-Xmx4000m
2.3.3. Configuration files
Configurations are automatically loaded upon rasdaman start. After any modification a restarthas to be performed for the change to take effect.
Server rasdaman configuration files can be found in $RMANHOME/etc:
|
allows fine-tunning the rasdaman servers, e.g. number of servers, names, database connection |
|
set petascope properties, e.g. backend/rasdaman connection details, CRS resolver URLs, features |
|
secore configuration |
Logging output of petascope and secore is configured in their respective config files, while logging output of rasdaman is controlled via the below configuration files:
|
log output of rasmgr |
|
log output of rasserver worker processes |
|
log output of client applications, e.g., rasql |
rasdaman uses the Easylogging++ library for logging in its C++ components. Log properties can be configured as documented on the EasyLogging GitHub page.
External, potentially relevant configuration files are:
postgresql |
|
tomcat |
|
2.3.4. Log files
rasdaman
rasdaman server logs are placed in $RMANHOME/log/. The server components
feed the following files where uid represents a unique identifier of the
process, and pid is a Linux process identifier:
rasserver.<uid>.<pid>.lograsserverworker logs: at any time there are several rasservers running (depending on the settings inrasmgr.conf) and each has a unique log file.rasmgr.<pid>.lograsmgrlog: there is only onerasmgrprocess running at any time.petascope.logpetascopelog ifjava_server=embeddedinpetascope.properties.
Note
ls -ltr is a useful command to see the most recently modified log
files at the bottom when debugging recently executed queries.
petascope & secore
The path to the petascope.log file is set in the log4j configuration section in
/opt/rasdaman/etc/petascope.properties.
If petascope is deployed embedded as part of rasdaman, then the path must be writable by the
rasdamanuser; default is on rasdaman installation islog4j.appender.rollingFile.File=/opt/rasdaman/log/petascope.log.If petascope is deployed in an external servlet container, by default Tomcat 9, then the path must be writable by the
tomcat9user; default islog4j.appender.rollingFile.File=/var/log/tomcat9/petascope.log.
2.3.5. Temporary files
Rasdaman stores various data temporarily in /tmp/rasdaman\_* directories,
in particular:
/tmp/rasdaman\_conversion/- format-encoded data, such as TIFF, NetCDF, etc., is in some cases temporarily stored here before decoding into rasdaman. This also happens always when encoding query processing results into some format for export. The intermediate data is quickly removed as soon as the encoding or decoding process is finished.Temporarily, however, this directory can get rather large: if you export array result that encodes into a 1GB TIFF file, then the directory will contain 1GB of data for some time; if 10 such queries run concurrently, then it may contain up to 10GB of data. For this reason we recommend to check the size of
/tmpduring installation, and make sure it is large enough. It is always recommended to make/tmpa separate partition, so as to prevent system-wide problems in case the filesystem is filled up with data./tmp/rasdaman\_petascope/- contains small temporary files generated during data import with the wcst_import tool./tmp/rasdaman\_transaction\_locks/- during query read/write transaction, rasdaman generates various empty lock files in this directory. As the files are empty, the size of this directory is minimal.While rasdaman is running this directory must not be removed, otherwise it may lead to data corruption.
2.3.6. Demo data & programs
2.3.6.1. Example database
A demonstration database is provided as part of the delivery package which contains the collections and images described in the Query Language Guide. To populate this database, first install the system as described here, and then invoke:
$ rasdaman_insertdemo.sh
The demo database occupies marginal disk space, and is a straightforward way to show that the rasdaman installation has been successfull.
2.3.6.2. Example programs
Several example programs are provided in the c++ and java subdirectories
of $RMANHOME/share/rasdaman/examples. Each directory contains a Makefile
plus .cc and .java sources, resp.
2.3.6.3. Makefile
The Makefile helps to compile and link the sample C++ / Java sources files
delivered. It is a good source for hints on the how-tos of compiler and linker
flags.
Note
All programs, once compiled and linked, print a usage synopsis when invoked without parameter.
2.3.6.4. query.cc
Sends a hardwired query to a running rasdaman system:
In addition, it demonstrates how to work with the result set returned from rasdaman. The query can easily be changed, or made a parameter to the program.
2.3.6.5. Query.java
Sends the following hardwired query if one is not provided as a parameter:
2.3.6.6. AvgCell.java
This program computes the average cell value from all images of a given
collection on client side. Note that it requires grayscale images. A good
candidate collection is mr from the demo database.
2.4. Access Interfaces
Rasdaman services can be invoked in several ways: through command line, Web requests, and custom programs connecting via the C++ and Java APIs.
2.4.1. Command Line Tools
Queries can be submitted to the command line tool rasql. Complete
control over the server is provided through several utilities, in
particular rasmgr; see rascontrol Invocation for details. All
tools can communicate with local and remote rasdaman servers.
2.4.2. Web Services
Several Web services are available with rasdaman. They are implemented as
servlets, hence independent from the array engine and only available if started
in a servlet container such as Tomcat or jetty. They can be accessed under the
common context path /rasdaman.
/rasdaman/owsexposes geo Web Services based on the interface standards of the Open Geospatial Consortium (OGC Web Services, OWS). Supported OGC standards are:Web Coverage Service (WCS)
Web Coverage Processing Service (WCPS)
Web Map Service (WMS) suites
/rasdaman/defprovides access to a Coordinate Reference System (CRS) Resolver Service, SECORE. It is identical to the one deployed by OGC, where http://www.opengis.net/def/crs is the branch for CRS served by SECORE./rasdaman/rasqlprovides support for submitting rasql queries and receiving results with standard HTTP requests. Requests must specify three mandatory parameters:usernamerasdaman login name under which the query will be executed
passwordpassword corresponding to the login
queryrasql query string, properly encoded for URI embedding
Example:
http://localhost:8080/rasdaman/rasql
    ?username=rasguest
    &password=rasguest
    &query=select%20encode%28mr2%2C%22png%22%29%20from%20mr
Note
rasql servlet also supports rasdaman user credentials in basic authentication header. In this case,
usernameandpasswordparameters are not required as the credentials are extracted from the header.
The diagram below illustrates the OGC service architecture of rasdaman:
2.4.3. APIs
Programmatic access is available through self-programmed code using the C++ and Java interfaces; see the C++ <cpp-dev-guide> and Java <java-dev-guide> guides for details.
2.5. Server Architecture
The parallel server architecture of rasdaman offers a scalable, distributed environment to efficiently process even very large numbers of concurrent client requests. Yet, server administration is easy to accomplish, with only few things to do to have a smoothly running, highly performant installation. Moreover, the system is implemented in a special high availability technique where most server management operations can be done with the server up and running, limiting the need for a server shutdown to the absolute minimum.
In this Section the general rasdaman server architecture is outlined. It is recommended to study this section so as to understand server administration terminology used in the next Section.
2.5.1. Executables Overview
The following executables are provided in the bin/ directory, among
others:
rasmgris the central rasdaman request dispatcher; clients connect torasmgrinitially and are then assigned to a specificrasserverprocess which will evaluate queries;rasserveris the rasdaman server engine, it should not be generally invoked in a standalone manner;rascontrolallows to interactively control the rasdaman server by communicating withrasmgr;rasqlis the command-line based query tool, explained in detail in the rasdaman Query Language Guide.
2.5.2. Server Manager and Server
2.5.2.1. Overview and Terminology
The rasdaman server configuration consists of one dispatcher process per
computer, rasmgr (we will refer to it as manager in the sequel), and
server processes, rasserver (referred to as servers), of which at a
given time none, one, or several ones can be running. All server
processes are under control of the manager. Server manager and rasdaman
server(s) all run on the same physical hardware, the rasdaman host.
The servers resolve requests, thereby generating calls to the relational database system which in turn accesses its database files. For the purpose of this manual, the relational server together with the database it maintains are collectively called the database. The machine the relational database server runs on is referred to as database host (Figure 2.1).
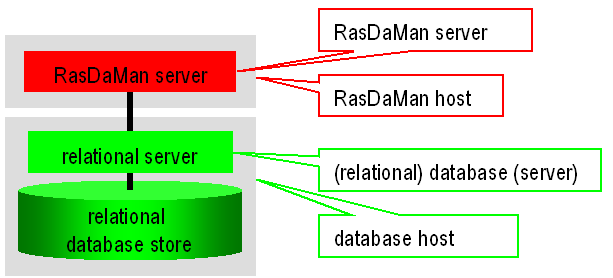
Figure 2.1 Overall server hierarchy, introducing the terminology for rasdaman hardware and software environment
2.5.2.2. Server Structure in General
The manager accepts client requests and assigns server instances to them, taking them from the pool of server processes it maintains. In distributed installations, it keeps contact to the managers on other machines to further dispatch client requests across all the rasdaman servers available. Whenever needed, the administrator can launch further server instances, or shut them down again.
Upon system configuration definition (see rascontrol Invocation), a unique name is assigned to each server identifying it to the manager.
Each rasdaman server is assigned to a relational database server, laid down in the manager configuration file. Databases can be registered and associated to particular rasdaman servers at any time.
rasdaman hosts and database hosts are identified by their resp. host
name in common domain address form, e.g., martini.rasdaman.com or
199.198.197.50.
Rascontrol is the interactive front-end to rasmgr and, as such, the main
utility for user and system management. It provides the necessary
functions to manage the whole system configuration, to add and remove
user, to change their rights, and to obtain information about system
activity.
The rasdaman server, i.e., rasserver, is controlled by the manager which
starts and stops server instances. Hence, the rasserver executable
should not (and actually cannot) be invoked directly.
2.5.2.3. Dynamic Server Assignment
The process of client/server communication and server scheduling is done as follows (see numbers in Figure 2.2).
The client starts every
OPENDBandBEGIN TRANSACTIONrequest with an HTTP call to the manager, providing the required service type (RPC, HTTP, etc.) and the database name, together with user name and password.The manager’s answer is the server ID of a free server, or an error message in case no server is available or access is denied for the given login.
Client-Server communication to perform the database requests.
Upon
CLOSEDBandABORT/COMMIT TRANSACTIONthe server informs the manager that it is available again. This is also done upon a client timeout.
These negotiation steps are performed between client library and server, hence transparent to the application.
The rasdaman server system is started by invoking the server manager
rasmgr (see Running the Manager). If it finds a configuration file, them
autopmatically all servers indicated will be started; alternatively,
server configuration can be done directly through rascontrol (see
rascontrol Invocation).
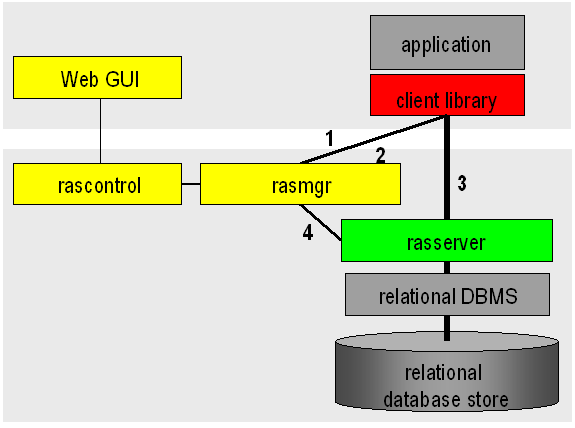
Figure 2.2 Internal server management
2.5.2.4. System Start-up
Invocation of the rasmgr executable must be done under the operating system
login under which the rasdaman installation has been done, usually (and
recommended) rasdaman. The service script /etc/init.d/rasdaman (when
rasdaman is installed from the packages) automatically takes care of this.
2.5.2.5. Authentication
On every machine hosting rasdaman servers a separate manager has to run.
The manager maintains an authorization file, $RMANHOME/etc/rasmgr.auth.
It should not be changed by the administrator, as they are
generated, maintained, and overwritten by the manager.
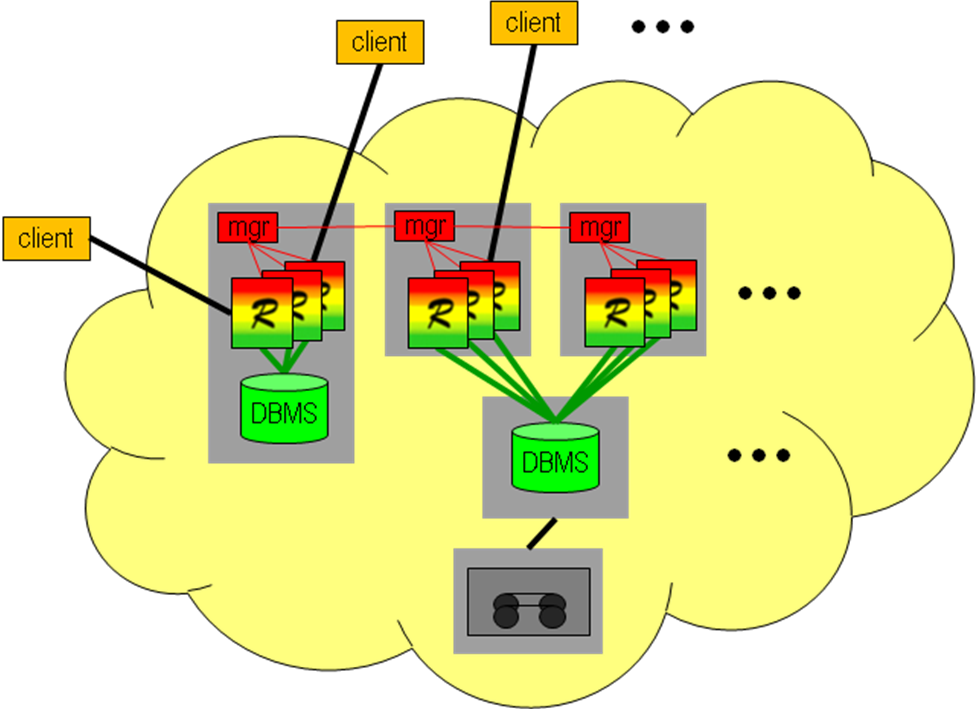
Figure 2.3 rasdaman federation
2.5.2.6. rasdaman Manager Defaults
The manager’s default name is the hostname (the one reported by the UNIX
command hostname), but it can be changed (see the change command). By
default, it listens to port 7001 for incoming requests and uses port
7001 for outgoing requests.
To keep overview of the ports used, it is recommended to use the following schema (there is, however, no restriction preventing from choosing another schema):
use port number 7001 for the server manager;
use port numbers 7002 to 7999 for rasdaman servers.
2.5.3. Storage backend
rasdaman can store array data in two different ways:
Arrays in a file system directory, array metadata in SQLite; this is default.
Everything in PostgreSQL: arrays in BLOBs, array metadata in tables.
Note
rasdaman enterprise additionally supports access to pre-existing archives of any structure.
The array storage variant can be chosen during the cmake configuration step (cf.
Table 2.1) by setting -DDEFAULT_BASEDB=sqlite|postgresql when
installing from source; it is fixed in the packages to sqlite, i.e. the
default recommended option.
2.5.3.1. Storing arrays in a file system directory
In this storage variant, a particular directory gets designated to hold rasdaman arrays (maintained by rasdaman) and their metadata (maintained by an SQLite instance embedded in rasdaman).
The recommended directory location is $RMANHOME/data/; administrators may
configure this to be a symbolic link to some other location, possibly another
filesystem than where $RMANHOME resides (so as to keep programs and data
separate). Alternatively, the path can be changed in the -connect option in
rasmgr.conf.
The data directory will contain the named database. Currently only one
database is supported, but this may change in future. Default database
name, assumed by all tools, is RASBASE. While it can be changed this
is not recommended as all tools will need to receive an extra parameter
indicating the changed name.
The database name needs to be communicated to rasdaman in the
$RMANHOME/etc/rasmgr.conf configuration file. Specifically, the
connect string should be an absolute path to the RASBASE database (note
that variables are not recognized in the script, therefore
$RMANHOME has to be spelt out). Assuming the default values described
above and a rasdaman installation directory of
$RMANHOME=/opt/rasdaman, the corresponding configuration line might
look like this:
define dbh rasdaman_host -connect /opt/rasdaman/data/RASBASE
Caution
For a customized data directory location it is recommended to use a symbolic link, rather than modify installation defaults.
2.5.3.2. Storing arrays in PostgreSQL BLOBs (deprecated)
In this storage variant, rasdaman arrays and their metadata are stored in a PostgreSQL database.
First, install and configure PostgreSQL for use with rasdaman.
To deploy rasdaman for using PostgreSQL make sure to configure with
-DDEFAULT_BASEDB=postgresql.
In $RMANHOME/etc/rasmgr.conf the connect string should be the name
of the RASBASE database, e.g:
define dbh rasdaman_host -connect RASBASE
The create_db.sh script sets this automatically. It is recommended
to keep this value because otherwise this name has to be changed in many
places across multiple clients and scripts.
2.6. Server Administration
This Section explains on how to manage a rasdaman service on a lower level: start up and shut down individual server workers, as well as how to monitor and influence server state.
It is recommended to first study the previous section so as to understand server administration terminology used here.
2.6.1. General Procedure
2.6.1.1. rasmgr vs. rascontrol
It is important to distinguish between the manager, rasmgr, and its
control front-end, rascontrol. The manager runs as a background process,
supervising activity of local (and possibly remote) rasdaman servers.
Interaction between user (i.e., administrator) and the manager takes
place through the interactive control front end.
In the sequel, it is first described how to launch the manager rasmgr,
then rascontrol commands are detailed.
2.6.1.2. Important Security Note
To remain compatible with older rasdaman versions, clients use login “rasguest” / password “rasguest” by default (i.e., when no user and password are explicitly set by the application). In the distribution configuration, this user is defined to have read-only access to the databases, so that users can access but not manipulate databases without authentication.
Therefore, the administrator is strongly urged to adapt authentication settings to the local security policy before switching databases online.
See Users and Their Rights to learn more about user management mechanisms.
2.6.2. Running the Manager
2.6.2.1. Manager Startup
Starting up the rasdaman system is done by invoking the rasdaman
manager, rasmgr, from a shell under the rasdaman operating system login.
Usually the manager will be sent to the background:
$ rasmgr &
Starting rasmgr is the only direct action to be done on it. Any further
administration is performed using rascontrol.
Note that, unless a server configuration has been defined already, no
rasdaman server is available just by starting the manager. Usually rasmgr is
started from start_rasdaman.sh, rather than directly.
2.6.2.2. Invocation Synopsis
Manager invocation synopsis:
$ rasmgr [--help] [--hostname h] [--port p]
where
- --help
print this help
- --hostname h
host on which the manager process is running is accessible under name / IP address h (default: output of Unix command hostname)
- --port p
manager will listen to port number p (default: 7001)
2.6.3. rascontrol Invocation
The manager front end, rascontrol, is a command-line interface used for rasdaman administration. It allows to define the whole rasdaman system configuration, including start up and shut down of server instances and user logins and rights.
To secure access to the server administration facilities, rascontrol performs a login process requesting login name and password similar to the Unix rlogin command. User name must be one of the users defined in the rasdaman authentication list (see Users and Their Rights).
2.6.3.1. rascontrol Synopsis
$ rascontrol [-h|--help] [--host *h*] [--port *n*] [--prompt *n*]
             [--quiet]
             [--login|--interactive|--execute *cmd*|--testlogin]
where
- --host h
name of the host where the manager runs (default: localhost)
- -h, --help
this help
- --port n
port number at which the manager listens to requests (default: 7001)
- --prompt n
change rascontrol prompt as follows:
0- prompt ‘>’1- prompt ‘rasc>’2- prompt ‘user:host>’
(default: 2)
- --quiet
quiet, don’t print header (default for
--loginand--testlogin)- --login
print login and password, obtained from interactive input, to
stdout, then exit (see Script Use below)- --interactive
read login and password from environment variable
RASLOGINinstead of requesting it interactively- --execute cmd
execute single
*cmd*and exit (batch mode); all text following-xuntil end of line is passed ascommand; this option implicitly assumes-e- --testlogin
just do a login and nothing else to check whether the login/password combination provided in the
RASLOGINvariable is valid
2.6.3.2. Interactive Use
In interactive use, rascontrol will be invoked with the host parameter
only. Following successful authentication, rascontrol accepts command
line input from stdin.
Here is an example session (mypasswd will not be echoed on screen):
2.6.3.3. Script Use
Alternatively to interactive login, user and password information can be
taken from the environment variable RASLOGIN. This variant is suitable
for batch scripting in conjunction with the -x option.
The following example shows how first the RASLOGIN is set appropriately:
$ export RASLOGIN=`rascontrol --login`
and then a sample Unix shell script which starts all rasdaman servers defined in the system configuration, performing implicit login from the environment variable contents which has been obtained from the previous command and pasted into the shell script:
#!/bin/bash
export RASLOGIN=rasadmin:mytotallyencryptedpassword
rascontrol -x up srv -all
2.6.3.4. Comments in Scripts
To enhance legibility of scripts, rascontrol accepts comments in the
usual shell syntax: Lines beginning with a hash sign ‘#’ will be
ignored, whatever they may contain. An example is usage in shell here
documents (type man sh in your favourite shell for further information
on this feature):
$ rascontrol <<EOF
# this is the command submitted to rascontrol:
list srv -all
# now terminate rascontrol:
exit
# the following line terminates rascontrol input:
EOF
$
2.6.4. rascontrol Command List
2.6.4.1. Command Synopsis
|
display information (general or about specific command) exit list info about the current status of the system start server(s) stop rasdaman server(s) or server manager(s) define a new object remove an object change parameters of objects make configuration changes permanent |
In the remainder of this section, commands are explained in detail, sorted by the targets they affect.
2.6.5. Server Hosts
2.6.5.1. Define Server Hosts
define host h -net n -port p
hsymbolic host name
-net nset network host name to n
-port pport on which the rasdaman manager will listen
2.6.5.2. Change Server Host Settings
change host h [-name n] [-net x] [-port p]
            [-uselocalhost [on|off] ]
hhost name whose entry is to be updated
-name nchange host name to n
-net xchange network name to x
-port pchange port number to p
-uselocalhost [on|off]use domain name localhost (IP address 127.0.0.1) instead of regular network host name; usually this speeds up communication a little (default:
on)
Note that it is not possible to change network name or port for a host while this server is running.
uselocalhost works only for the master manager and is on by default. This means that the servers running on manager master host should
2.6.5.3. Remove Server Host Definitions
remove host h
hhost name whose entry is to be deleted
Remove host h from the definition table.
It is not possible to remove a host definition while the corresponding host has active servers.
2.6.6. rasdaman Servers
2.6.6.1. Define rasdaman Servers
define srv s -host h -port p -dbh d
    [-autorestart [on|off] [-countdown c]
    [-xp options]
sa unique, not yet used name for the server
-host hname of the host where the server will run
-port pTCP/IP port on which the server will listen (recommended: 7002 - 7999)
-dbh ddatabase host where the relational database server to which the rasdaman server connects will run
-autorestart afor
a = on: automatically restart rasdaman server after unanticipated termination fora = off: don’t restart (default:a = on)-countdown cfor
c > 0: restart rasdaman server after c requests forc = 0: run rasdaman server indefinitely (default:c = 10000)-xp optionspass option string options to server upon start (default: no options, i.e., empty string)
Option -xp must be the last option. Everything following “-xp” until end of
line is considered to be options and will be passed, at startup time, to the
server.
2.6.6.2. Change Server Settings
change srv s [-name n] [-port p] [-dbh d]
        [-autorestart [on|off] [-countdown c]
        [-xp options]
schange settings for server s
-name nchange server name to n
-port pchange port number to p
-dbh dnew database host where the relational database server runs to which the rasdaman server connects
-autorestart afor
a = on: automatically restart rasdaman server after unanticipated termination fora = off: don’t restart-countdown cfor
c > 0: restart rasdaman server after c requests forc = 0: run rasdaman server indefinitely-xp optionspass option string options to server upon start
Option -xp must be the last option. Everything following “-xp” until end of
line is considered to be options and will be passed, at startup time, to the
server.
Restrictions:
The server host cannot be changed.
The server name cannot be changed while the server is up.
The new settings will be used only next time the server starts.
2.6.6.3. Remove rasdaman Server Definitions
remove srv s
sserver name whose entry is to be deleted
Remove server s from the definition table.
It is not possible to remove a server definition while the corresponding server is up and running
2.6.6.4. Status Information
list srv [ s | -host h | -all ] [-p]
sgive information about server s
-host hgive information about all servers running on host h information is requested
-alllist information about all servers on all hosts (default)
-padditionally list configuration information
The first is variant prints status information of the currently defined server(s); if s is provided, then only server s is listed.
2.6.7. Database Hosts
2.6.7.1. Define Database Hosts
define dbh h [-connect c]
ha unique symbolic database host name, usually the host machine name
-connect cthe connection string used to connect
rasserverto the backend database server; see Storage backend for more details on the format of c depending on whether the backend DBMS is SQLite or PostgreSQL.
2.6.7.2. Change Database Host Settings
change dbh h [-name n] [-connect c]
hdatabase host whose entry is to be changed
-name nchange symbolic database host name to n
-connect cchange connect string to c; see Storage backend for more details on the format of c depending on whether the backend DBMS is SQLite or PostgreSQL.
The connection parameters can be changed at any time, however the servers will get the information only when they are restarted.
2.6.7.3. Remove Database Host Definitions
remove dbh h
hdatabase host name whose entry is to be deleted
Remove database host h from the definition table.
It is not possible to remove a database host definition while this database host has active servers connected to it.
2.6.7.4. Status Information
list dbhList all relational database hosts currently defined.
2.6.8. Databases
Databases represent the physical database itself, together with the relational database server accessing them. It is possible to have multiple database definitions in the rasdaman server environment which are distinguished by the database host; the interpretation, then, is that the same contents (be it the same physical database or a mirrored copy) is available through relational servers running on the different hosts mentioned. In other words, when a client opens a database, the server manager can freely choose any of the database hosts on which the database indicated is defined.
The pair (database,database host) must be unique.
2.6.8.1. Define Databases
define db d -dbh db
ddefine database with name d
-dbh dbset database host name to db
2.6.8.2. Change Database Settings
change db d -name n
ddatabase whose name is to be changed
-name nchange to new database name n
2.6.8.3. Remove Database Definitions
remove db d -dbh db
dname of database to be removed
-dbh dbhost name of database to be removed
Remove definition of database d from the definition table. The database itself remains unchanged, it is not physically deleted.
It is not possible to remove a database definition while the corresponding database has open transactions.
2.6.8.4. Status Information
list db [ d | -dbh h | -all ]
dgive information about servers connected to database d
-dbh hgive information about all servers connected to database d via database host h
-alllist information about all servers connected to any known database (default)
List relational database(s) defined.
2.6.9. Server Start-up and Shutdown
Server Start
up srv [ s | -host h | -all ]
sstart only server s
-host sstart all servers on host h; this requires that a manager has been started on this host previously.
-allstart all servers defined; note that only those servers can be started on whose host a manager is currently running.
Look up the named server(s) in the definition list, and start the specified one(s) using the previously defined individual startup parameters.
At least one of the options s, -host s, and -all must be present.
Server Shutdown
down srv [ s | -host h | -all ] [-force] [-kill]
sname of the server to be stopped
-host sterminate all servers on host h
-allterminate all servers
-forcesend SIGTERM immediately, don’t wait for transaction end
-killsend SIGKILL immediately, don’t wait for transaction end
This command shuts down the indicated server(s). At least one of the options s, -host s, and -all must be present.
Without -force and -kill, the server is marked for shut down and will
actually be terminated by sending SIGTERM after completing the current
transaction. With -force and -kill, the server is terminated
instantaneously; this should be handled with extreme caution, as
experience shows that relational database systems react differently on
such a situation: usually a running transaction is aborted (which is the
desired behavior), but sometimes the running transaction is committed
(most likely leaving the database in an inconsistent state). See a Unix
manual for the difference between SIGTERM and SIGKILL signals.
The manager on host h is not terminated.
2.6.10. Users and Their Rights
Similarly to operating systems, rasdaman knows named users with access rights associated to them. Each rasdaman client must log in to the system under a specific login name using its specific password; this holds for database clients as well as for database administration. With each login name, a set of rights is associated which determines the set of actions admitted to the user under this login.
To this end, the rasdaman administrator manages user login names (user names) equipped with a password and rights to access the databases.
Attention: There is no way to retrieve a lost password!
The set of known logins as well as the associated rights all are under
administrator control; the define and remove commands serve to add or
delete user logins, the change user command allows to individually
assign rights to a login.
In the rasdaman system’s initial state after installation, user rasadmin
is defined owning all possible rights (see below). A further user
rasguest is defined which owns read-only access (“R”) rights.
For both users, the password initially is identical with the user name. It is highly recommended to change this immediately (See Change User Attributes).
2.6.10.1. Define New User
define user u [-passwd p] [-rights r]
ulogin name, must be unique (i.e., not yet existing)
-passwd pset login password to pass
-rights rrights associated with this login
The user’s password can be changed at any time (see Change User Attributes).
2.6.10.2. Remove User
remove user u
ulogin name to be removed
The user is removed from the login list and henceforth cannot login to the rasdaman system any more.
2.6.10.3. User Rights
User rights are indicated by upper case letters. They are divided into two categories: system rights and database rights. System rights apply to the whole system configuration of a server machine, whereas database rights can be specified individually for a database.
The following system rights are defined:
Cuser may change the system configuration
Aaccess control: the user may perform user management
Sstart/stop right: the user may start and stop the system, in particular: rasdaman servers
Iinfo retrieval: the user may retrieve server status information
The following database rights are defined:
Ruser is allowed read data (select...from...where) from rasdaman databases
Wuser is granted write access (update, insert, delete) to rasdaman databases
2.6.10.4. Notation of Rights
In the change user command used for user rights administration, a
user’s rights set is described by a rights string. It is built from
letters denoting the rights to be granted.
To revoke a right, leave out the corresponding character. To grant no rights at all, use - (minus sign).
No blanks or other characters are allowed in a rights string.
Examples of valid rights strings are:
grant all rights:
CASIRWgrant read access only:
Rgrant no rights at all:
-
These are examples for invalid rights strings:
Blanks between rights:
CA SIR WInvalid characters I:
AXYZSInvalid characters II:
A_+S
2.6.10.5. Change User Attributes
change user u [-name n | -passwd p | -rights r]
Options:
uuser login to be updated
-name nchange user name to n
-passwd pchange password to p
-rights rchange rights of user u according to rights string r
Change name of user, login password, or user rights.
2.6.10.6. Status Information
list user [-rights]
-rightsadditionally list rights assigned to each user
List all user names currently defined, optionally with their rights.
2.6.11. Server Control Options
The following options can be passed to the server when it is started by
the server manager using the up srv command. Option settings are defined
for a particular server using the rascontrol command change srv -xp
which passes the rest of the line after -xp on to the server upon
starting it (see rasdaman Servers).
- --log logfile
print log to logfile. If logfile is stdout, then log output will be printed to standard output. It is not recommended setting this option. (default:
$RMANHOME/log/rasserver.uuid.serverpid.log)- --transbuffer b
maximum size of transfer buffer to b bytes (default: 100000000 bytes = 100 MB)
- --tilesize s
default maximal size of tiles in bytes used when no tile size is specified in queries (default: 4194304 bytes)
- --pctmin s
minimal size of inline tiles in bytes (default: 2048)
- --pctmax s
maximal size of inline tiles in bytes (default: 4096)
- --tiling name
default tiling scheme when inserting data when no tiling clause is specified, one of: NoTiling, RegularTiling, AlignedTiling (default: AlignedTiling)
- --tileconf dom
default tile configuration when inserting data when no tiling clause is specified (default: [0:1023,0:1023])
- --index name
default index to be used when inserting data when no tiling tiling clause is specified, one of: auto, dir, rdir, nrp, rnrp, tc, rc (default: nrp, i.e. R+ tree)
- --indexsize s
specify the node size of the index; value of 0 lets rasdaman itself determine this value (default: 0)
2.6.12. Distributed Query Processing
Rasdaman can form a federation network for query answering. In such a
setup, rasmgrs facing congestion (i.e., all rasserver worker processes
busy) will try to acquire a free server from some other rasmgr’s holding
in the federation.
2.6.12.1. Session-based server assignment
As always in rasdaman, acquisition and release of server processes is done on session level: when a client opens a new connection, it gets a server assigned; when it closes the connection, this server is released and put back into the pool of available processes. Hence, for optimal load balance clients should strive to have short-running sessions and not keep open connections unduly for a long time.
2.6.12.2. Federation network
The federation network is defined in a decentralized way: each rasmgr
knows peers from which it accepts requests, and to which it can send
requests. To this end, each rasmgr maintains an inpeer and outpeer
list:
The
inpeerlist contains those hosts from which this node’srasmgrwill accept requests.The
outpeerlist contains those hosts which this node’srasmgrwill ask for server processes on local session overflow.
By manipulating these two lists administrators can exercise fine-grain security policy in a rasdaman federation network.
Note that the federation connectivity graph is not necessarily
symmetric: a rasmgr may send requests to some other rasmgr, but not
accept requests, and vice versa, depending on the individual
configuration.
Each host individually respects these statements, there is no global rasdaman federation configuration.
2.6.12.3. Federation node addressing
Addressing is based on hostnames, where a hostname in the sequel is one of
a domain name, resolvable by this
rasmgr’s hostan IP address
All inpeer and outpeer statements accumulate so that host identifiers
can be added and removed incrementally.
2.6.12.4. Security
A rasmgr request for a server process on another host is treated by the
incoming host in the same way as any such incoming client request. The
requesting rasmgr authenticates via the login and password which the
originating client used for authenticating against rasdaman in the first
place.
This implies that a client approaching such a federation must be known in all federation nodes. See Users and Their Rights for details on users and the various permissions they can have on a database.
If neither any inpeer nor any outpeer is defined (either interactively
through rascontrol or by way of settings in rasmgr.conf) then this
rasdaman instance will act completely standalone and will neither send
nor accept peer requests.
2.6.12.5. Define peers
define inpeer hostname
hostnamehost from which requests for rasdaman server process assignment will be accepted by this rasmgr
define outpeer hostname [-port portnumber]
hostnamehost from which this rasmgr may request a rasdaman server process
portnumberport number at which the rasmgr on that host is listening (default: 7001)
2.6.12.6. List peers
list inpeer

list outpeer
These commands list all currently defined inpeers and outpeers, respectively.
2.6.12.7. Remove peers
remove inpeer hostname

remove outpeer hostname
These commands remove hostname hostname listed from the list of peers.
2.6.12.8. Examples
define inpeer www.acme.com

define inpeer 192.168.28.10
2.6.12.9. Caveat: fluctuating IPs
In cloud environments, IP addresses are maintained dynamically and can change for a given host between reboots. Hence, when growing a rasdaman federation by launching new VMs care must be taken that the in- and outpeers received the proper current IP address.
2.6.12.10. Restrictions
In the current version, the queries are distributed only if the receiving rasmgr has no locally assigned rasservers. This limitation will be removed in the next release.
2.6.13. Miscellaneous
2.6.13.1. Help
help
Display top level help page
help [command]
command help
Display information specific to command
(both syntax variants are equivalent)
2.6.13.3. Save Changes to Disk
save
The save operation writes the current configuration and authorization
values to disk. All changes done during the session thus become
permanent.
2.7. Security
2.7.1. General
There are several security measures available, which should be considered seriously. Among them are the access right mechanisms found in Tomcat, rasdaman, and PostgreSQL. We highly recommend to make use of these.
For Tomcat and PostgreSQL refer to the pertaining documentation. The servlet is safe against SQL injection attacks - we are not aware of any means for the user to send custom queries to the PostgreSQL server or the rasdaman server. XSRF and XSS represent no danger to the service because there is no user generated content available.
For rasdaman, we recommend to change the default user passwords in rasdaman (rasguest/rasguest for read-only access, rasadmin/rasadmin for read-write and administrator access) to not run into the Oracle “Scott/tiger” trap. Even better, use additional separate, private users. The rasdaman service doesn’t use cookies.
2.7.2. Potential XSS attack
XSS (Cross-Site Scripting) is a type of Web attack where an attacker (with a valid account in rasdaman with write permissions) injects malicious code (usually JavaScript) through regular create / update requests. When another user opens a Web page that loads the content containing this malicious code, the code is automatically executed in their Web browser. The code may be crafted to exfiltrate private / sensitive information, such as user credentials, for example.
In petascope, all user inputs are validated for potentially malicious content that could be used in XSS attacks, except for XML inputs in several API. Valid XML can closely resemble potential XSS attack code, so it impossible to reliably distinguish it from malicious content. These API include:
WCS-T InsertCoverage (docs)
WCS-T UpdateCoverage (docs)
Update coverage metadata (docs)
Update coverage’s range type (docs)
Create/Update a WMS layer’s style (docs)
Therefore, it is prudent to be cautious and properly sanitize responses from petascope API when using them into Web clients / HTML pages. API responses should not be integrated directly into HTML, as doing so could potentially trigger an XSS attacks.
We note, however, that the risk for an attack like this is very low, as an attacker must first compromise an existing rasdaman account with adequate write permissions.
2.8. Backup
Both software and hardware can fail, therefore it is prudent to establish regular backup procedures. For rasdaman in particular a couple of things should be considered for inclusion in a backup:
The rasdaman database, which normally can be found in
/opt/rasdaman/data. The SQL database itself in this directory,RASBASE, is fairly small; theTILESsubdirectory may be large as it contains all the array data, but if backup disk space is not scarce then it is definitely recommended to backup as well. Incremental backups of theTILESwith rsync for example should work well without unnecessary duplicated data copying, unless existing data areas are often updated. Example with rsync:# backup small RASBASE to /backup/rasdamandb rsync -avz /opt/rasdaman/data/RASBASE /backup/rasdamandb/ # backup potentially large TILES dir to /backup/rasdamandb rsync -avz /opt/rasdaman/data/TILES /backup/rasdamandb/
The petascopedb geo metadata database is usually small and worth backing up. By default it is stored in PostgreSQL and can be extracted into a small compressed archive as follows:
# create backup in a gzip archive petascopedb.sql.gz
sudo -u postgres pg_dump petascopedb | gzip > /backup/petascopedb.sql.gz
If necessary, it can be restored with
# if a petascopedb already exists it needs to be renamed, as otherwise
# restoring over an existing petascopedb will corrupt it
sudo -u postgres psql -c "ALTER DATABASE petascopedb RENAME TO petascopedb_existing_backup"

# create an empty petascopedb
sudo -u postgres createdb petascopedb

# restore backup petascopedb.sql.gz (use cat if it's not a gzip archive)
zcat petascopedb.sql.gz | sudo -u postgres psql -d petascopedb --quiet > /dev/null
Alternatively, if the above fails for some reason, petascopedb can be backup with this command:
# note that /backup/petascopedb_backup will contain a large number of compressed files
sudo -u postgres pg_dump -j 8 -Fd petascopedb -f /backup/petascopedb_backup
If necessary, it can be restored with
sudo -u postgres pg_restore -j 8 -d petascopedb /backup/petascopedb_backupThe rasdaman configuration files in
/opt/rasdaman/etc, but also consider thebinandsharedirectories which may be useful in case of package update problems, as well as maybe log files in thelogdirectory.# backup everything except the data dir, which is handled in step 1. above rsync -avz --exclude='data/' /opt/rasdaman /backup/
2.9. Migration
2.9.1. From one machine to another
Sometimes it is necessary to migrate the installation from one machine (OLD) to another (NEW). This section outlines the steps on how to do this.
Make sure rasdaman is installed and functional on the NEW machine.
Stop rasdaman and an external tomcat if installed on both the OLD and NEW machine, e.g:
sudo service rasdaman stop
sudo service tomcat9 stop
Make a backup of the rasdaman and petascope databases on the OLD machine by following step 1. of the backup guide and copy the backup to the NEW machine.
Restore the database backups on the NEW machine by following step 2. of the backup guide.
Make a backup of the config files on the NEW machine (
/opt/rasdaman/etc), then copy relevant configuration from the OLD to the NEW machine, in particular:rasmgr.confcan probably copied as is, but check if the -host setting is correct for the NEW machine;most settings from
petascope.propertiescan be copied as is, except the ones for database configuration (spring.* and metadata*);/etc/default/rasdamancan be copied as is usually;
Make sure that the
/opt/rasdamandirectory is owned by therasdamanuser, to avoid any permission issues caused by copying with other system users:sudo chown -R rasdaman: /opt/rasdaman
Finally start rasdaman and tomcat:
sudo service rasdaman start
sudo service tomcat9 start
2.9.2. Ubuntu 18.04 to Ubuntu 20.04
These instructions are for rasdaman installation from DEB packages, but can be helpful in case of other installation methods as well.
Make a backup of the rasdaman and petascope databases by following the backup guide. In particular:
# postgres version
OLDVER=10
# alt 1: create backup in petascopedb.sql.gz; to be restored with psql
sudo -u postgres pg_dump petascopedb | gzip > /backup/petascopedb.sql.gz
# alt 2: text backup to be restored with pg_restore
sudo -u postgres pg_dump --create --compress=5 petascopedb \
  --file=/backup/petascopedb.sql.gz
# backup postgres databases by direct copy as well just in case
sudo cp -a /var/lib/postgresql/$OLDVER/main/ /backup/petascopedb_raw_$OLDVER
# backup postgres config
sudo cp -a /etc/postgresql/$OLDVER /backup/etc_postgresql_$OLDVER
# backup rasdaman dir
sudo cp -a /opt/rasdaman /backup/opt_rasdaman
Disable the rasdaman repo in apt and remove rasdaman:
REPO_FILE=/etc/apt/sources.list.d/rasdaman.list
sudo mv $REPO_FILE $REPO_FILE.disabled
# remove rasdaman package; this won't remove any configuration/data
sudo service rasdaman stop
sudo apt remove "$(dpkg -l | grep '^ii *rasdaman' | awk '{ print $2; }')"
Upgrade to Ubuntu 20.04:
# first remove this package as it breaks the upgrade
apt remove postgresql-10-postgis-2.4
# then upgrade
do-release-upgrade
Migrate data to new postgres version:
sudo apt install postgresql-12-postgis-3

OLDVER=10
NEWVER=12

# ideally one would run this command and be done, but it fails because the old
# postgresql-10-postgis-2.4 gets removed during the upgrade and it is required
# in order to do the pg_upgrade. Execute it in any case, as it may migrate
# at least configuration files like pg_hba.conf
sudo systemctl stop postgresql.service
sudo -u postgres /usr/lib/postgresql/$NEWVER/bin/pg_upgrade \
  --old-datadir=/var/lib/postgresql/$OLDVER/main \
  --new-datadir=/var/lib/postgresql/$NEWVER/main \
  --old-bindir=/usr/lib/postgresql/$OLDVER/bin \
  --new-bindir=/usr/lib/postgresql/$NEWVER/bin \
  --old-options "-c config_file=/etc/postgresql/$OLDVER/main/postgresql.conf" \
  --new-options "-c config_file=/etc/postgresql/$NEWVER/main/postgresql.conf"
sudo systemctl start postgresql.service

# instead we have to restore the backup created in step 1. with psql/pg_restore
sudo -u postgres -i

#
# alt 1: restore database with psql
/usr/lib/postgresql/$NEWVER/bin/createdb -p 5433 petascopedb
# enter the spring.datasource.password= from /opt/rasdaman/etc/petascope.properties
/usr/lib/postgresql/$NEWVER/bin/createuser -s -p 5433 petauser -P
zcat /backup/petascopedb.sql.gz | \
  /usr/lib/postgresql/$NEWVER/bin/psql -p 5433 -d petascopedb > /dev/null
#
# alt 2: restore database with pg_restore
pg_restore -p 5433 --file=/backup/petascopedb.sql.gz
#

# swap ports in postgres config, so the new version is at 5432
sed -i 's/port = 5432/port = 5433/' /etc/postgresql/$OLDVER/main/postgresql.conf
sed -i 's/port = 5433/port = 5432/' /etc/postgresql/$NEWVER/main/postgresql.conf

# restart postgres
sudo systemctl restart postgresql.service

# check version, should show 12.x
sudo -u postgres psql -c "SELECT version();"
Install rasdaman:
# enable rasdaman repo with correct distribution codename
REPO_FILE=/etc/apt/sources.list.d/rasdaman.list
sed 's/bionic/focal/g' $REPO_FILE.disabled | sudo tee $REPO_FILE
sudo apt update
# install rasdaman
sudo apt install rasdaman
Test rasdaman installation to make sure everything is working
Remove old postgres (purge removes its configuration and data as well):
sudo apt purge postgresql-10 postgresql-client-10
2.9.3. Ubuntu 20.04 to Ubuntu 22.04
These instructions are for rasdaman installation from DEB packages, but can be helpful in case of other installation methods as well.
Make a backup of the rasdaman and petascope databases by following the backup guide. In particular:
# postgres version
OLDVER=12
# alt 1: create backup in petascopedb.sql.gz; to be restored with psql
sudo -u postgres pg_dump petascopedb | gzip > /backup/petascopedb.sql.gz
# alt 2: text backup to be restored with pg_restore
sudo -u postgres pg_dump --create --compress=5 petascopedb \
  --file=/backup/petascopedb.sql.gz
# backup postgres databases by direct copy as well just in case
sudo cp -a /var/lib/postgresql/$OLDVER/main/ /backup/petascopedb_raw_$OLDVER
# backup postgres config
sudo cp -a /etc/postgresql/$OLDVER /backup/etc_postgresql_$OLDVER
# backup rasdaman dir
sudo cp -a /opt/rasdaman /backup/opt_rasdaman
Disable the rasdaman repo in apt and remove rasdaman:
REPO_FILE=/etc/apt/sources.list.d/rasdaman.list
sudo mv $REPO_FILE $REPO_FILE.disabled
# remove rasdaman package; this won't remove any configuration/data
sudo service rasdaman stop
sudo apt remove "$(dpkg -l | grep '^ii *rasdaman' | awk '{ print $2; }')"
Upgrade to Ubuntu 22.04 with
do-release-upgradeMigrate data to new postgres version:
sudo systemctl stop postgresql.service
sudo apt install postgresql-14-postgis-3

# migrate data
sudo -u postgres -i
cd /tmp
OLDVER=12
NEWVER=14

# migrate petascopedb
/usr/lib/postgresql/$NEWVER/bin/pg_upgrade \
  --old-datadir=/var/lib/postgresql/$OLDVER/main \
  --new-datadir=/var/lib/postgresql/$NEWVER/main \
  --old-bindir=/usr/lib/postgresql/$OLDVER/bin \
  --new-bindir=/usr/lib/postgresql/$NEWVER/bin \
  --old-options "-c config_file=/etc/postgresql/$OLDVER/main/postgresql.conf" \
  --new-options "-c config_file=/etc/postgresql/$NEWVER/main/postgresql.conf"

# swap ports in postgres config, so the new version is at 5432
sed -i 's/port = 5432/port = 5433/' /etc/postgresql/$OLDVER/main/postgresql.conf
sed -i 's/port = 5433/port = 5432/' /etc/postgresql/$NEWVER/main/postgresql.conf

# restart postgres
sudo systemctl restart postgresql.service

sudo -u postgres -i
/usr/lib/postgresql/$NEWVER/bin/vacuumdb --all --analyze-in-stages

# check version, should show 14.x
psql -c "SELECT version();"
Install rasdaman:
# enable rasdaman repo with correct distribution codename
REPO_FILE=/etc/apt/sources.list.d/rasdaman.list
sed 's/focal/jammy/g' $REPO_FILE.disabled | sudo tee $REPO_FILE
sudo apt update
# install rasdaman
sudo apt install rasdaman
Test rasdaman installation to make sure everything is working; if UDFs are deployed they will need to be recompiled, and same with any custom C++ clients.
Remove old postgres (purge removes its configuration and data as well):
sudo -u postgres /tmp/delete_old_cluster.sh
sudo apt purge postgresql-12 postgresql-client-12 postgresql-12-postgis-3
2.9.4. Ubuntu 22.04 to Ubuntu 24.04
These instructions are for rasdaman installation from DEB packages, but can be helpful in case of other installation methods as well.
Make a backup of the rasdaman and petascope databases by following the backup guide. In particular:
# postgres version
OLDVER=14
# alt 1: create backup in petascopedb.sql.gz; to be restored with psql
sudo -u postgres pg_dump petascopedb | gzip > /backup/petascopedb.sql.gz
# alt 2: text backup to be restored with pg_restore
sudo -u postgres pg_dump --create --compress=5 petascopedb \
  --file=/backup/petascopedb.sql.gz
# backup postgres databases by direct copy as well just in case
sudo cp -a /var/lib/postgresql/$OLDVER/main/ /backup/petascopedb_raw_$OLDVER
# backup postgres config
sudo cp -a /etc/postgresql/$OLDVER /backup/etc_postgresql_$OLDVER
# backup rasdaman dir (note the data subdir may be large)
sudo cp -a /opt/rasdaman /backup/opt_rasdaman
Disable the rasdaman repo in apt and remove rasdaman:
REPO_FILE=/etc/apt/sources.list.d/rasdaman.list
sudo mv $REPO_FILE $REPO_FILE.disabled
# remove rasdaman package; this won't remove any configuration/data
sudo service rasdaman stop
sudo apt remove "$(dpkg -l | grep '^ii *rasdaman' | awk '{ print $2; }')"
Upgrade to Ubuntu 24.04:
do-release-upgradeIf this command fails due to the
postgresql-14-postgis-3package, it has to be removed first:sudo apt remove postgresql-14-postgis-3
Migrate data to new postgres version:
sudo systemctl stop postgresql.service
sudo apt install postgresql-16-postgis-3

# if postgresql-14-postgis-3 was removed in step 2. it has to be installed
# again now, otherwise the petascopedb migration command later on will fail
echo 'deb http://archive.ubuntu.com/ubuntu jammy main restricted universe multiverse' | sudo tee -a /etc/apt/sources.list
sudo apt update
sudo apt install -y postgresql-14-postgis-3

# if external tomcat is used for petascope deployment, then install the
# tomcat9 package from the jammy repositories, as petascope is
# incompatible with the tomcat10 in the noble (Ubuntu 24.04) repository
sudo apt install -y tomcat9

# migrate data
sudo -u postgres -i
cd /tmp
OLDVER=14
NEWVER=16

# migrate petascopedb
/usr/lib/postgresql/$NEWVER/bin/pg_upgrade \
  --old-datadir=/var/lib/postgresql/$OLDVER/main \
  --new-datadir=/var/lib/postgresql/$NEWVER/main \
  --old-bindir=/usr/lib/postgresql/$OLDVER/bin \
  --new-bindir=/usr/lib/postgresql/$NEWVER/bin \
  --old-options "-c config_file=/etc/postgresql/$OLDVER/main/postgresql.conf" \
  --new-options "-c config_file=/etc/postgresql/$NEWVER/main/postgresql.conf"

# swap ports in postgres config, so the new version is at 5432
sed -i 's/port = 5432/port = 5433/' /etc/postgresql/$OLDVER/main/postgresql.conf
sed -i 's/port = 5433/port = 5432/' /etc/postgresql/$NEWVER/main/postgresql.conf

# restart postgres (run this command in a different terminal)
sudo systemctl restart postgresql.service

/usr/lib/postgresql/$NEWVER/bin/vacuumdb --all --analyze-in-stages

# check version, should show 16.x
psql -c "SELECT version();"

# finally, remove any lines with jammy in /etc/apt/sources.list
Install rasdaman:
# enable rasdaman repo with correct distribution codename
REPO_FILE=/etc/apt/sources.list.d/rasdaman.list
sed 's/jammy/noble/g' $REPO_FILE.disabled | sudo tee $REPO_FILE
sudo apt update

# install rasdaman
sudo apt install -o Dpkg::Options::="--force-confdef" rasdaman
Test the rasdaman installation to make sure everything is working; if UDFs are deployed they will need to be recompiled, and same with any custom C++ clients.
Remove old postgres (purge removes its configuration and data as well):
sudo -u postgres /tmp/delete_old_cluster.sh
sudo apt purge postgresql-14 postgresql-client-14 postgresql-14-postgis-3
2.10. Uninstallation
When uninstalling rasdaman, you can execute the following commands to ensure that all installed files and services are fully removed from the system.
Note
These instructions are only applicable if rasdaman was installed from package or with the rasdaman installer.
2.11. Troubleshooting
2.11.1. General
The first step in troubleshooting problems should be to look into the server logs.
Start with checking the rasmgr and rasserver logs for any errors. If
this does not provide any clues, check the petascope.log or catalina.out.
Next, investigate the status of rasdaman and external Tomcat if applicable
with systemctl rasdaman status (and similar for Tomcat). Inspect the
output of ps aux | grep ras to list details about the rasdaman processes,
or top for CPU and memory usage.
It can be useful to double check the system memory usage with free -m,
and disk space usage with df -h.